FROM BREAD TO CHOCOLATE BROWNIES - ALL THINGS INTERESTING
Cookie Cake from a baking mix
As if it couldn’t get any better!
A cookie cake is the perfect balance between making a cake and making cookies but needing a cake and not having enough time for it!!
I always feel the pressure to have the perfect cake, and maybe because I used to be a cake decorator and home baker! Now, I just want everyone to enjoy it, to look decent and share in the memories and moments around said cake!
This quicker and easier version is just perfect!!
It stores the same way a normal cookie would, a few days in a airtight container. However, as usual we are a bunch of eaters in our house and we finished it in record time!
I also made two - so two tier if you must, but I decorated one and Ayden did the other! I think making them ontop of each other would be pretty nice!!

This was a real easy cookie cake to make as I used the Funfetti Sugar Cookie Mix and followed the intructions on the back !
METHOD & EQUIPMENT
1x Funfetti Sprinkle Cookie Mix
1 x Egg
115g Butter
Two Lined round baking tins - 6 inch
Icing Sugar - or of choice!
Decorations!!!
Mix up the Funfetti Sugar Cookie Mix as per instructions. Then, divide the dough ball in half and press one half into the lined baking tin and the other into the other lined baking tin!
It was realy easy and little Maddy did one tin all by herself !!
I baked them both at the same time for 12 minutes! I feel it would of been fine around 11 minutes too! Just keep your eye on them around this time!
Loosen the sides from the tin, then let them cool completely before taking them out of the pan so you dont break the soft warm cookie!
Now decorate as you please!


Keto Carrot Cake - baking mix
The last few days I have been having a craving for Carrot Cake but not any old Carrot Cake, the specific kind that is slightly healthier and a little bit better for the kids!
I decided to use the trusty Original Bread Mix and turn it into a Carrot Cake - you can make it Keto Carrot Cake pretty easy or leave it as is, both ways are delicious and perfect when the craving strikes!
STORAGE
I made little loaves, ie little Carrot Cakes baked into a mini loaf tin and they were kept on the bench in a container for days. I wont recommend keeping them any longer than that, unless you pop them into the fridge, that should give you a day or two extra!
EQUIPMENT
Nothing fancy other than, some sort of baking tin, a grater and something to mix with!
FREEZER
I am not sure, ours did not make it past day 5, we ate it all, but I do know the Original Baking Mix, once baked can be frozen and I presume the Mini Carrot Cakes will be perfect when frozen and defrosted again! But do let me know if you do freeze them!

INGREDIENTS NEEDED
1 x Original Baking Mix
150g grated carrots
1 teaspoon cinnamon powder
1 teaspoon baking poweder
4 large eggs
1/4 cup sugar - sweetner of choice
150g melted butter
1 tablespoon oil
Melt the butter and stir in the sugar/sweetner. Add all the other ingredients an give it a good mix.
Fill your mini loaf tin 3/4 of the way full and bake on 180 for 15 mins - or until the skewer comes out clean
CREAM CHEESE ICING - SMALL BATCH
4 tablespoons soft butter
4 tablespoons room temp cream cheese
1/4 icing sugar / sweetner of choice
Mix it all together and pipe/spread onto your individual mini carrot cakes once cooled
Left over Easter Eggs- I hear you
We used to go BIG with Easter, and when I say this I mean, the Easter bunny would bring alot, grandparents would bring, aunties and uncles would supply more Easter eggs and so did we!
We ended up having to hide so many eggs it would take me a full 40 mins to hide them all, and towards the end I was just throwing chocolate around the grass and up in to the trees, just to get done with it! We toned that down!!!
But, we still find ourselves stuck with leftovers!! WTH!
If you are like me and bow have WAY less but still WAY too much, try this

Grab all those bits of chocolate as a rule for every 100g of “extra chocolate eggs and biscuits) add 100g normal melted chocolate
ie if you have 100g of broken left over chocolate pieces and 100g plain biscuits you will then need 200g chocolate slab
Melt the chocolate slab in a bowl and add the crushed easter eggs and crushed biscuits and mi x well!
Grab a lined baking sheet and spread mixture over it, before it cools down. Pop it into the fridge for at least 30 minutes and then break it into pieces!

Sheet Pan Cake - from a cake mix
Who remembers having a cake made in a beer box?
I had one of these at almost every birthday party, so did my friends and so did their friends….and you get the idea here!
I remember the cake as always being vanilla and frosted with my favorite colour at the time and layered with sprinkles! But for the life of me, I haven’t been able to find a recipe or an actual instruction on how to do this. How big is the cake mix, does it get baked in this beer box? Surely, it will need to be super clean or layered with baking paper? Does the box not burn??
Well, I was kindly sent a recipe a few weeks back and I going to try and figure it out, but I am a bit scared as I don’t particularly need to burn down the oven!
So, I figured until I sort this cake mix out, I will use my vanilla cake mix and bake it in a sheet!
Here is what you will need
Vanilla Cake Mix from Flour & Dough - this one is nice a big and makes a good size
or you can buy the complete kit that comes with sprinkles, piping bag, cake mix, nozzle and a FREE GIFT
eggs
buttermilk
butter
water
icing sugar
more butter
sprinkles
You will need some kitchen equipment
bowl
spatula
mixer
baking tins - I used square for this cake 20cm x 20 cm
baking paper - line that tin!
oven :)
STORAGE
Storing for me has always been a problem, i have young kids, neighbours and friends who all know, i always have something here for them to eat!
But, as with all freshly baked goods…3- 5 days in a airtight container and you can stretch it a day or two in the fridge!
BUT - this cake FREEZES beautifully! You have two choices really
freeze it before you decorate it
or freeze it after you decorate it
Either way, let it cool completely, and wrap it in cling wrap and then a layer of tin foil! I like to decorate, then pop it in the fridge for at least an hour and then wrap it, this way you don’t get massive dents and smudges in the soft butter icing!

LETS GET TO IT THEN
Grab all your ingredients
Start by adding the cake mix to your mixing bowl. Give your eggs a good old whip and add all the wet ingredients.
LINE YOUR TIN with baking paper! The last thing you want is this to get stuck!
Add our cake mixture to the baking tin and pop into the oven!
I am going to do a loaf cake next! Any ideas for flavours??
Make up your icing of choice while this is in the oven and once cooled, all you have to do is spread it all over and add sprinkles to the top!
This is my version of the cake in a beer box!

Hope you have a great time baking and sharing your treats!
Low Carb Donuts - 4g carbs!!
We all make our New Years resolutions, and when I make mine and listen to my friends, they all sound something similar in the lines of health, wealth and happiness. I spose I am now in that era where that’s what is important!
My kids tend to enjoy snacking on chocolate, chips and well, whatever I put into the cupboard that’s quick and easy! So, to be fair I am to blame for these choices they are left to make! However, when I don’t load the cupboard full of these things and limit them to moderation they are completely happy to eat healthy snacks and fun things I make and bake!
We, as in the family LOVE donuts. I mean as in my hubby will gladly drive 20 minutes to the nearest store and grab a 4 pack and come back just keep the “kids” happy! Right?
So after re-looking my resolutions and figuring out how I can make donuts better for us but still taste really darn good and also get back to how we like to do things, get the kids involved in the baking, I set off to make something I haven’t done before!
At 4 grams per donuts - without the icing and decorations on top, you really have to try these!
LOW CARB / KETO DONUTS - from a baking mix - let’s just applaud that because the fact that it worked was amazing!
TIPS AND TRICKS
double dip the icing sugar on top
have your toppings ready for when the donuts are cooled - the icing dries quick
work on a cooling wrack with something underneath - they drip and it becomes messy

STORAGE
We hovered these down pretty quick but I would say 3 days in a airtight container on the bench, or 5 days in the fridge. I did freeze one for a week, until I decided to eat it, and it was completely fine!
I found these really quick and easy to adjust to any food plan that you are on or just keeping to low sugar and living a healthier lifestyle! Since they are made with good for you ingredients and keto sugars, the only “bad thing” I did have was the biscoff biscuit crumbs I added to the tops! Which, truly, is not bad it’s plain delicious!
It’s a delicious one bowl recipe that makes for easy cleaning of equipment and the recipe is Gluten Free and Keto friendly! Donuts are such an easy snacking option, especially when they are healthy and you don’t have to drive 20 minutes to get your fix! You most likely will have everything on hand including a Flour and Dough Baking Mix - right??
INGREDIENTS - 6 Donuts - x2 for 12
1 x Original Flour & Dough Bread Mix
1/4 Cup Sugar / Sweetener of choice
50g Melted Butter
1/4 Cup Double Cream
2 Eggs
ICING
1 Cup Powdered Sweetener of Choice - I did use Icing Sugar
2-3 Tablespoons Water
If making 6 donuts - use half the packet of Flour and Dough Baking Mix. ie 115 g
Preheat your oven to 180C and spray your donut pan.
Whisk your two eggs, and the add all the ingredients into your mixing bowl, including the eggs and mix well.
Fill each donut hole 3/4 full. Bake on the lowest rack for 15 minutes. Do watch them as they tend to burn very quickly, I also like to add a empty baking sheet to one of the higher racks, just to prevent it from getting that direct heat from the top!
One they are done, remove from the oven and let them sit for a good 20 minutes to cool before you remove the from the donut pan.
Let them cool completely before you mix up your icing sugar.
DECORATING YOUR DONUTS
This was the best part for me and the kids!
Use any food coloring to make your icing different colors, I even add a bit of cocoa powder to one batch to turn it more chocolatey!
Add sprinkles, biscoff crumbs, freeze dried raspberries, m&m’s anything you have on hand or plain old cinnamon sugar!
Don’t forget to double dip your keto donuts into the icing as it really does look better and gives that little extra bit of flavour!

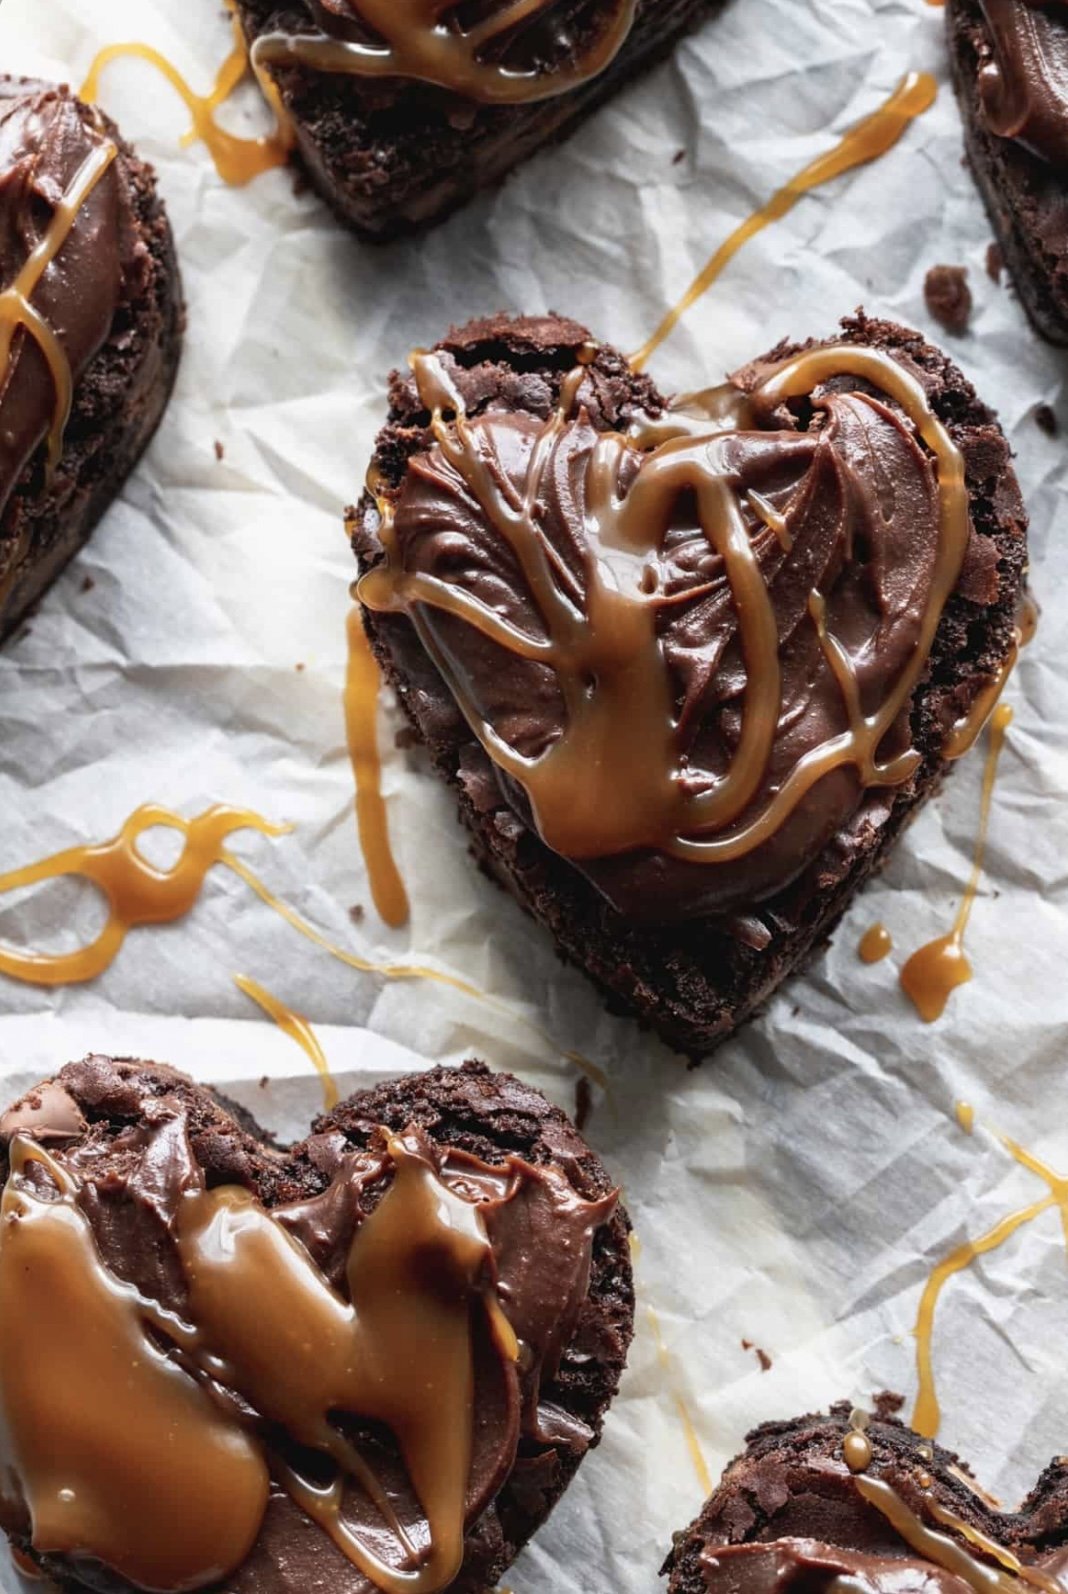
Loaded Brownies with raspberry
If you know, you know, I am the self proclaimed best brownie baker ever! Biased - of course!
I love a brownie, plain, eaten fresh from the oven while still reasonably hot, but I also love them even more when they have had time to fudgy up in the fridge! I haven’t quite figured out which one I prefer, as they both seem to hit the spot really well when it comes to the best brownie!
Have you ever had a brownie not loaded, covered in more chocolate, sweets and even raspberries? I mean, have you really ever?
Lately, this is the only way I crave a fudgy chewy brownie, loaded, with extra goodies!
I have made this brownie baking mix to work either way, straight from the oven, left to fudgy up in the fridge and even amazing when turned into a loaded brownie!
Its your turn to let me know what you prefer, and which ones you have tried!
This recipe uses the one and only Flour and Dough brownie baking mix!
It uses some icing sugar for the top and then some dried raspberries put on quickly afterwards so they stick to the icing sugar and then cut up into squares or however you please!

Raspberry Loaded Brownie
These turned out to be the most amazing brownies ever! The sweeet from the chocolate was broken by the bitter of the raspberry and made a very interesting flavour combo!
TIPS AND TRICKS
Make the brownie baking mix as per the instructions
let it cool slightly in the pan and then place it into the fridge for at least 3 hours - overnight if you can
let the brownie cool down - if not placing into the fridge as above - before you add teh icing sugar otherwise it will melt right off!
STORAGE
As you know by now - I dont realy know as we eat these brownies in record time! However, when going on my other baking mixes and the life they have, I would say 3-5 days in a airtight container! In the firdge they will last longer!
WHAT YOU NEED FROM YOUR PANTRY
2 Eggs
150g Melted Butter
!.4 Cup Icing Suger
1 Teaspoon Water
1 Tablespoon Dried Raspberry
Sprinkles!!
The recipe here is simple, use our brownie baking mix, mix it all together and bake as per the instructions on the back!
If you are going to use the tip above and place them in the fridge, wait until then to mix your icing sugar if not, make sure your brownie slab is completely cool before mixing and adding the icing sugar mixture!
Mix some icing sugar in the colour of choice, I used white as I liked the colour contrast from the dried raspberries and then also added some sprinkles, because who doesnt love sprinkles???
Drizzle the icing sugar onto the top of the brownie and then sprinkle the dried raspberry and the sprinkles over!
Cut into desired square sizes and don’t forget to try and share!

Chocolate brownie in a mug recipe
Oh the endless possibilities of a chocolate brownie mix that is just realy frikken awesome!!!
I am VERY late to the world of mug cakes, I have always known about them, always used a stock standard recipe, but never made a variation of it or even tried to think of something better!
Until now that is!
Did you see my Biscoff Mug Cake recipe?
If not, go have a look, it’s too die for and just so darn quick and easy and a real show stopper if you add some extra goodness to the top!
It’s Easter in a few weeks, I honestly can’t believe it, it really feels like something is wrong with my calendar, like maybe one of the kids keeps pulling the months off?
In all things easter baking, I decided to do one of my all time favorite new addiction chocolate brownie in a mug recipes!
For me this is mixed up within 5 minutes and done cooking! My microwave is set to 900W so, I presume that’s HIGH. After mixing, 90seconds is all it needs and it’s done!

Chocolate Brownie in a Mug
I make quite a few of these in the colder months, as both my kids prefer to eat chocolate than to drink it, funny, as I prefer it to! Maybe it’s one of those indirect things that I have made them do!
I, again, don’t really know how long this will last if not eaten straight away, but to be fair, these are made to be eaten straight away and not really kept for a rainy day! As I am writing this, its literally pouring down on my windows!
WHAT YOU NEED
Our Chocolate Brownie Mix - of course :)
4 tablespoons of milk
1 teaspoon of oil
Some extra Mini Eggs for garnish - since its almost Easter, or whatever you feel like adding to the top!
METHOD
Take 5 Tablespoons from your brownie baking mix, add it to your mug. Add the milk and oil to the same mug and give it a good mix. Here, you can add some extra chocolate chips, mini eggs, dried raspberries, honestly whatever makes you happy, or leave it plain!
Pop this into the microwave for 90 seconds. This is how long mine went on 900W - HIGH. It tends to pull away from the sides very slightly when it’s ready. Or do a test and insert a skewer!
Add your favorite toppings to the top of your chocolate brownie in a mug, and please be carefull as it’s VERY hot when it’s just come out the microwave!
WHAT HAPPENS TO THE REST OF THE BROWNIE MIX AFTER YOU HAVE MADE A CHOCOLATE BROWNIE IN A MUG?
This, is a really good question!
A-B-S-O-L-U-T-E-L-Y nothing!
Just re-seal it using the little zipper thingy at the top, and use it EXACTLY as you would when needing to make your brownie! How’s that for being versatile!
If you decide to make more chocolate brownie mug cakes, please do let me know how many you get out of a pouch!! I have never gotten that far and if I do, I forget how many I made 3 weeks later! LOL!
Blondie Bars - Valentines Day cuteness
Valentines Day for me, in our family is a day we celebrate together in a way that’s fun and special for everyone!
I have always wanted a son, who will grow up to be respectful and romantic towards his future wife, and by showing him and having him see first hand how it’s done, helps me and him achieve this goal!
Every year I send a small treat to his class, this year, I am sending the Valentines Day Pencil Toppers that I have shared on the home page - Valentines Day Pencil Toppers - you can download directly from here too.
It’s such a fun way to add some cuteness and cheer to a classroom filled with some new faces a bit of a ice breaker too!
I am not sure if we will be doing a breakfast, lunch or dinner, but either of these will be done! We don’t do a massive event that costs us heaps, I get the kids to cut and colour some hearts, do some pictures, maybe even hang a few balloons, depending on what I have hanging around in the cupboard at the time! But, the food, the food is always the centre stage! I get together with the kids and we make a delicious fun meal, over laden with chocolate and strawberries and something that everyone is excited about!
I made these blondie bars as a trial, and they came out PERFECTLY!
TIPS AND TRICKS
These are pretty straight forward, but here are my tips
use milk chocolate as it melts easier - I tried half with white - it just did’nt work for me
add your sprinkles as soon as you can onto the still hot chocolate - this way they stick and don’t fall off
wait until COMPLETELY cooled before slicing
STORAGE
up to 5 days in a airtight container
currently have mine frozen - they are still perfect after 1 month!

Here is the recipe for the Valentines Day Blondie Bars - the way I made them
INGREDIENTS
1 x Fudgy Chocolate Blondie Baking Mix
1 cup milk chocolate - for melting on top
Valentines Day Sprinkles
METHOD
Mix and bake blondie baking mix as per instructions on the packet.
As soon as it is done, either
add the chopped chocolate pieces to the top of the baked blondies and wait 2 minutes until the start to melt an using a spatula spread them over the blondies
or, melt your chocolate before hand and then add this to the top of the blondies and spread evenly
Then, add your Valentines Day sprinkles to the top and leave until this is cooled completely. Slice as desired.
I cut my 20x20cm block of blondies into 8 strips and then cut each strip into 3.
I hope you have a go at this and don’t forget to tag us #flouranddoughnz so I can see all your lovely creations!
Have a great Valentines Day!!

Your Creativity with a Cake Kit
Are you ready to unleash your inner cake artist? With a cake kit, you can sprinkle some magic onto your baking creations and bring your wildest confectionery dreams to life. Whether you're a beginner or an experienced baker looking to elevate your skills, a cake kit is the perfect tool to help you tap into your creativity and create show-stopping desserts.
Imagine having all the ingredients, decorations, and step-by-step instructions in one convenient package. No more worrying about gathering all the necessary supplies or searching for that perfect recipe. With a cake kit, everything you need is at your fingertips, making the baking process a breeze.
Not only does a cake kit save you time and effort, but it also allows you to experiment with different flavors, designs, and techniques. From themed birthday cakes to elegant wedding creations, the possibilities are endless. So why limit yourself to store-bought cakes when you can proudly showcase your own edible masterpieces?
Get ready to embark on a delicious and artistic journey with a cake kit. Let your imagination run wild and watch as your cakes become the center of attention at any gathering. With a little sprinkle of magic, you'll be amazed at what you can create.
Benefits of using a cake kit and a cake mix
1. Convenience and Time-saving
One of the major benefits of using a cake kit is the convenience it offers. With all the ingredients and decorations pre-measured and included in the kit, you don't have to spend time searching for individual items at the grocery store. This saves you both time and effort, allowing you to focus on the fun part – decorating your cake!
Additionally, a cake kit provides you with step-by-step instructions, eliminating the need to scour the internet for recipes and tutorials. Everything you need to know is right there in the kit, making the baking process smooth and stress-free.
2. Unlock Your Creativity
Using a cake kit doesn't mean you have to compromise on creativity. In fact, it can be a catalyst for unleashing your artistic side. With a wide variety of designs and decorations to choose from, a cake kit allows you to experiment and explore different styles.
You can customize your cake mix with various colors, shapes, and patterns, and even add your own unique touches. Whether you're creating a whimsical birthday cake or an elegant wedding masterpiece, a cake kit provides you with the tools and inspiration to let your imagination run wild.
3. Perfect for All Skill Levels
Whether you're a seasoned baker or a complete novice, a cake kit is suitable for all skill levels. For beginners, it provides a structured approach to baking and decorating, with clear instructions and pre-measured ingredients. This helps build confidence and ensures a successful outcome, even for those who are new to the world of baking.
For experienced bakers, a cake kit offers the opportunity to experiment with new techniques and designs. It provides a solid foundation to build upon, allowing you to push the boundaries of your creativity and take your skills to the next level.

Tips for decorating cakes with a cake kit
Now that you're familiar with the benefits of using a cake kit, let's dive into some tips and tricks for decorating your cakes like a pro.
1. Plan Ahead
Before starting your cake decorating journey, take some time to plan out your design. Look through the instructions provided in the cake kit and visualize how you want your finished cake to look. Consider the color scheme, the placement of decorations, and any additional elements you want to incorporate.
By planning ahead, you can ensure a cohesive and visually appealing cake that meets your expectations. It also helps you stay organized throughout the decorating process, preventing any last-minute surprises.
2. Practice Piping
Piping is an essential skill in cake decorating, and a cake kit often includes piping bags and tips to help you achieve professional-looking designs. Practice different piping techniques on a separate surface before applying them to your cake.
Start with simple designs and gradually work your way up to more intricate patterns. Remember to apply consistent pressure on the piping bag to ensure even lines and shapes. With practice, you'll soon be piping beautiful flowers, borders, and personalized messages onto your cakes.
3. Experiment with Flavors and Fillings
A cake kit not only provides you with the basics of cake decorating but also allows you to explore different flavors and fillings. Don't be afraid to deviate from the suggested recipe and add your own twist to the cake.
Consider incorporating flavored syrups, fruit fillings, or even layers of different cake flavors. This will not only enhance the taste of your cake but also add an element of surprise and delight for those enjoying it.
DIY cake kit vs. professional cake decorator
While a cake kit offers numerous advantages, it's important to weigh the pros and cons of using one versus hiring a professional cake decorator.
DIY Cake Kit
Using a cake kit gives you the satisfaction of creating something with your own hands. It allows you to personalize your cake and control every aspect of the decorating process. It's a great option for those who enjoy baking as a hobby and want to showcase their creativity.
However, it's worth noting that creating a professional-looking cake requires practice and patience. While a cake kit provides the tools and instructions, achieving flawless results may take time, especially for beginners. If you're prepared to invest the effort into honing your skills, a DIY cake kit can be a rewarding experience.
Professional Cake Decorator
On the other hand, hiring a professional cake decorator ensures a polished and expertly crafted cake. Professionals have years of experience and knowledge, allowing them to create stunning designs that leave a lasting impression.
If you have a special occasion or a specific design in mind that requires intricate details, a professional cake decorator can bring your vision to life. They have access to a wide range of techniques and tools, which may be challenging to replicate with a cake kit alone.
However, it's important to consider the cost and availability of professional cake decorators. They may require advanced booking and have a higher price range compared to using a cake kit. Additionally, the personal touch and sense of accomplishment that come with creating your own cake may be missing.
Conclusion: Embrace your creativity with a cake kit
In conclusion, a cake kit is a fantastic tool for unleashing your creativity and creating beautiful, customized cakes. It offers convenience, saves time, and provides a platform for experimentation and self-expression.
Whether you're a beginner or an experienced baker, a cake kit allows you to tap into your artistic side and create cakes that are not only delicious but visually stunning. With a little sprinkle of magic and the right tools at your disposal, you'll be amazed at what you can achieve.
So, don't hold back! Embrace your creativity, grab a cake kit, and let your imagination soar. Your friends and family will be in awe of your edible masterpieces, and you'll have the satisfaction of knowing that each cake is a reflection of your talent and passion. Happy baking!

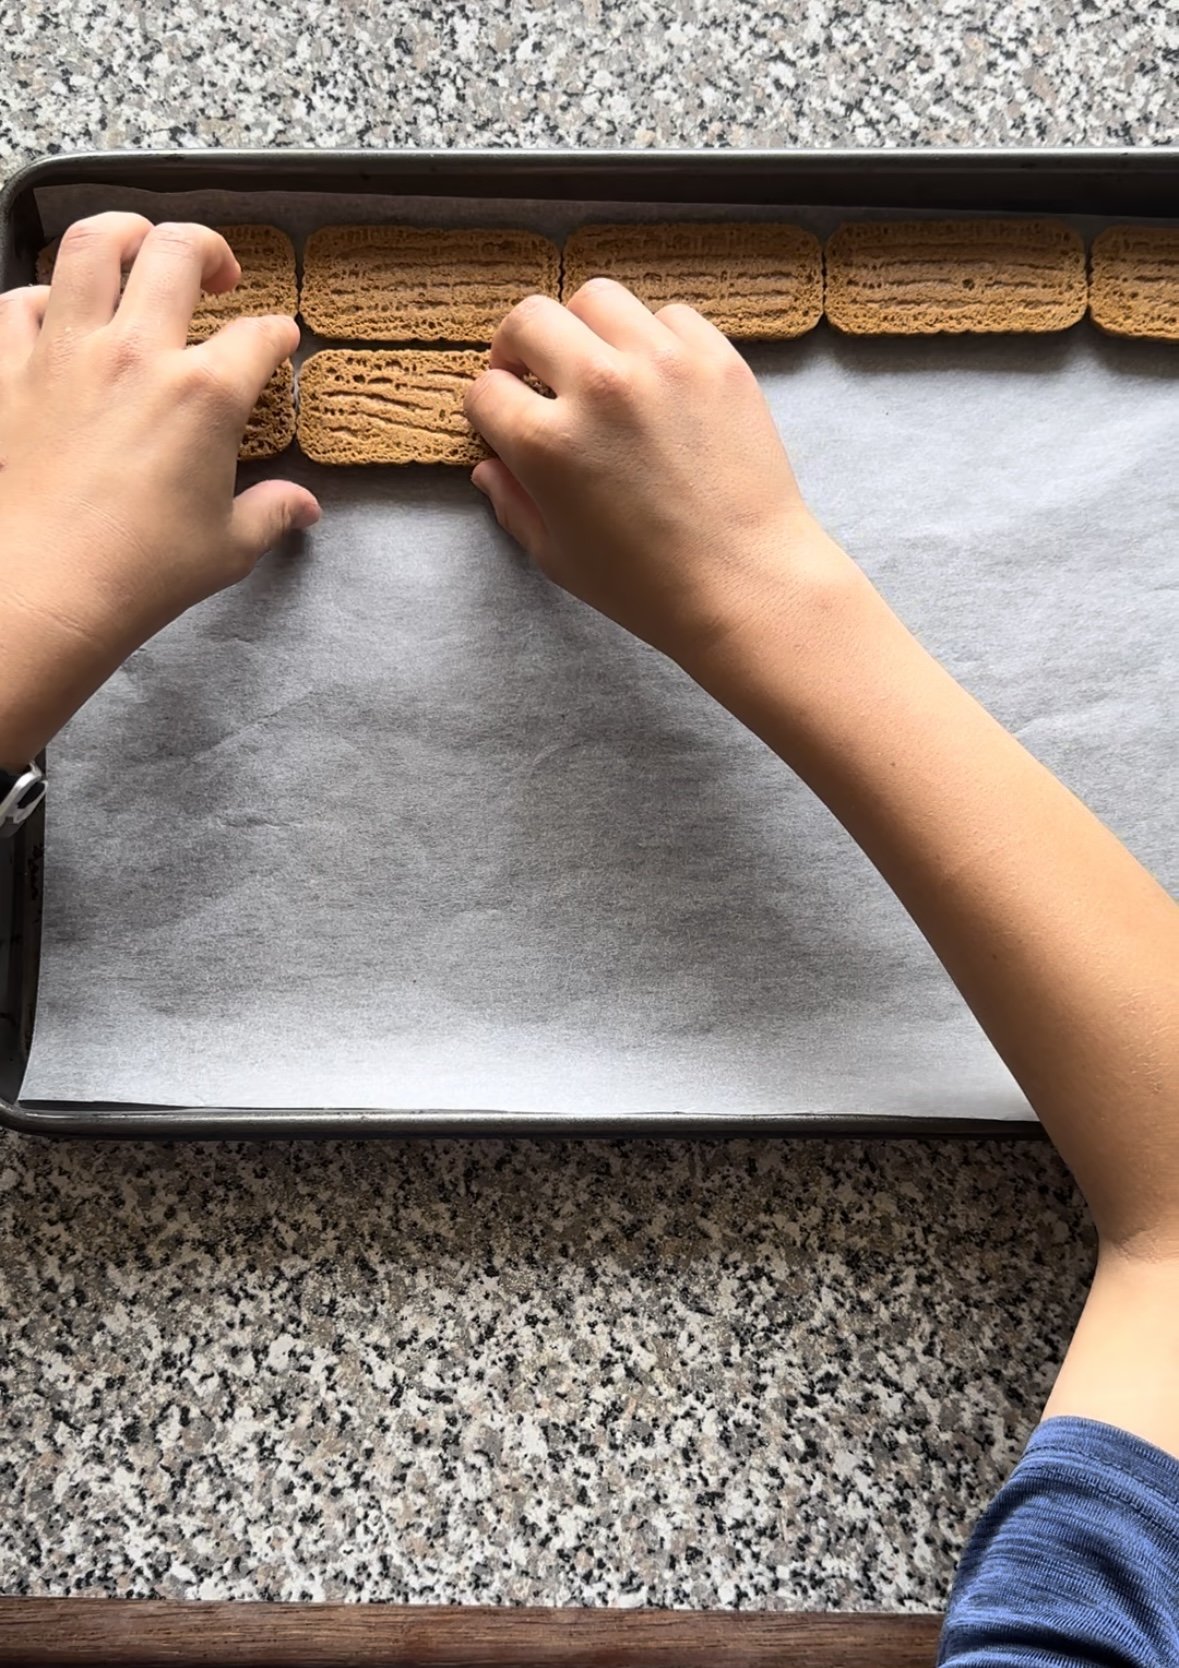
Christmas Crack
When you see a hack, you just have to try it! When it’s this easy, it’s even more of a reason to try it!
My youngest is still at kindy, and I needed to entertain my oldest while at home on his holiday! We got to work!
For all the nitty gritty things, I REALY don’t know how long this will last, I presume the biscuits will go soft after a day or two, but everything should be fine to eat for at least 5 days! Did your even last that long?
We made a cookie sheet full, so roughly 25x35cm, we did share some at swimming with friends, but the majority was eaten at home in record time!
I kept ours in a airtight container on the kitchen bench! It was totaly fine there and tempting everyone when they walked past, so again, finished in record time!
I used Biscoff biscuits, I think there are 24 in a packet….? Not actually sure, so our Christmas Crack ended up breaking, mostly, into biscoff cookie size, which is perfect, as it’s incredibly sweet! I would use the biscoff cookies again, and definitely offset the sweetness with salt flakes on top!
INGREDIENTS
Biscuits of choice - enough to fill the bottom of your sheet pan - mine is 25x35cm and I was short 3 biscuits from a biscoff packet
1/2 cup butter
1/2 cup brown sugar
1 cup chocolate of choice - slab/chunks
Toppings of choice
DEFINATELY SALT
Pre-heat your oven 180C and line your baking pan with baking paper
Add your butter to a small saucepan and melt, once melted add your brown sugar. Let this cook, stirring while it goes, until it has combined. this tends to happen once it reaches boiling point and bubbles for a good 5 minutes.
Pack your biscuits all along your sheet, breaking any to fit into the edges if needed. Make sure you have lined your entire tin at the bottom with the biscuit. Now pour over the butter and sugar mixture, its VERY hot, and using a offset spatula or a rubber spatula, spread it over the biscuits. Don’t worry too much, as it tends to spread when you put it into the oven.
Put this tray into the oven and let it bake for 8 minutes. In this time either melt your chocolate, or break your chocolate into smaller pieces, and make sure you have prepped your toppings, cut them, break them, have them ready to sprinkle on top.
Take out the sheet from the oven add the chocolate all over and give it a minute or two and these should start to melt! Once you see the chunks melting, start to spread the the chocolate over the top of the caramel mixture.
If you have melted your chocolate already, give the caramel mixture a minute to cool down, otherwise the caramel and chocolate will mix, and you want to have two layers. The chocolate will set quite quickly, so add your toppings on top as soon as you can, I gave mine a little gentle nudge down into the chocolate and please do add your salt flakes. It’s realy nice to offset the sweetness.
Pop this into the fridge for a few hours. I put mine into the freezer, as we couldn’t wait that long! It took 30 minutes and it was good to go!
Now break it up as you please, my Christmas crack broke really nicely around each biscoff biscuit.
That’s it! Easy as baking for everyone!
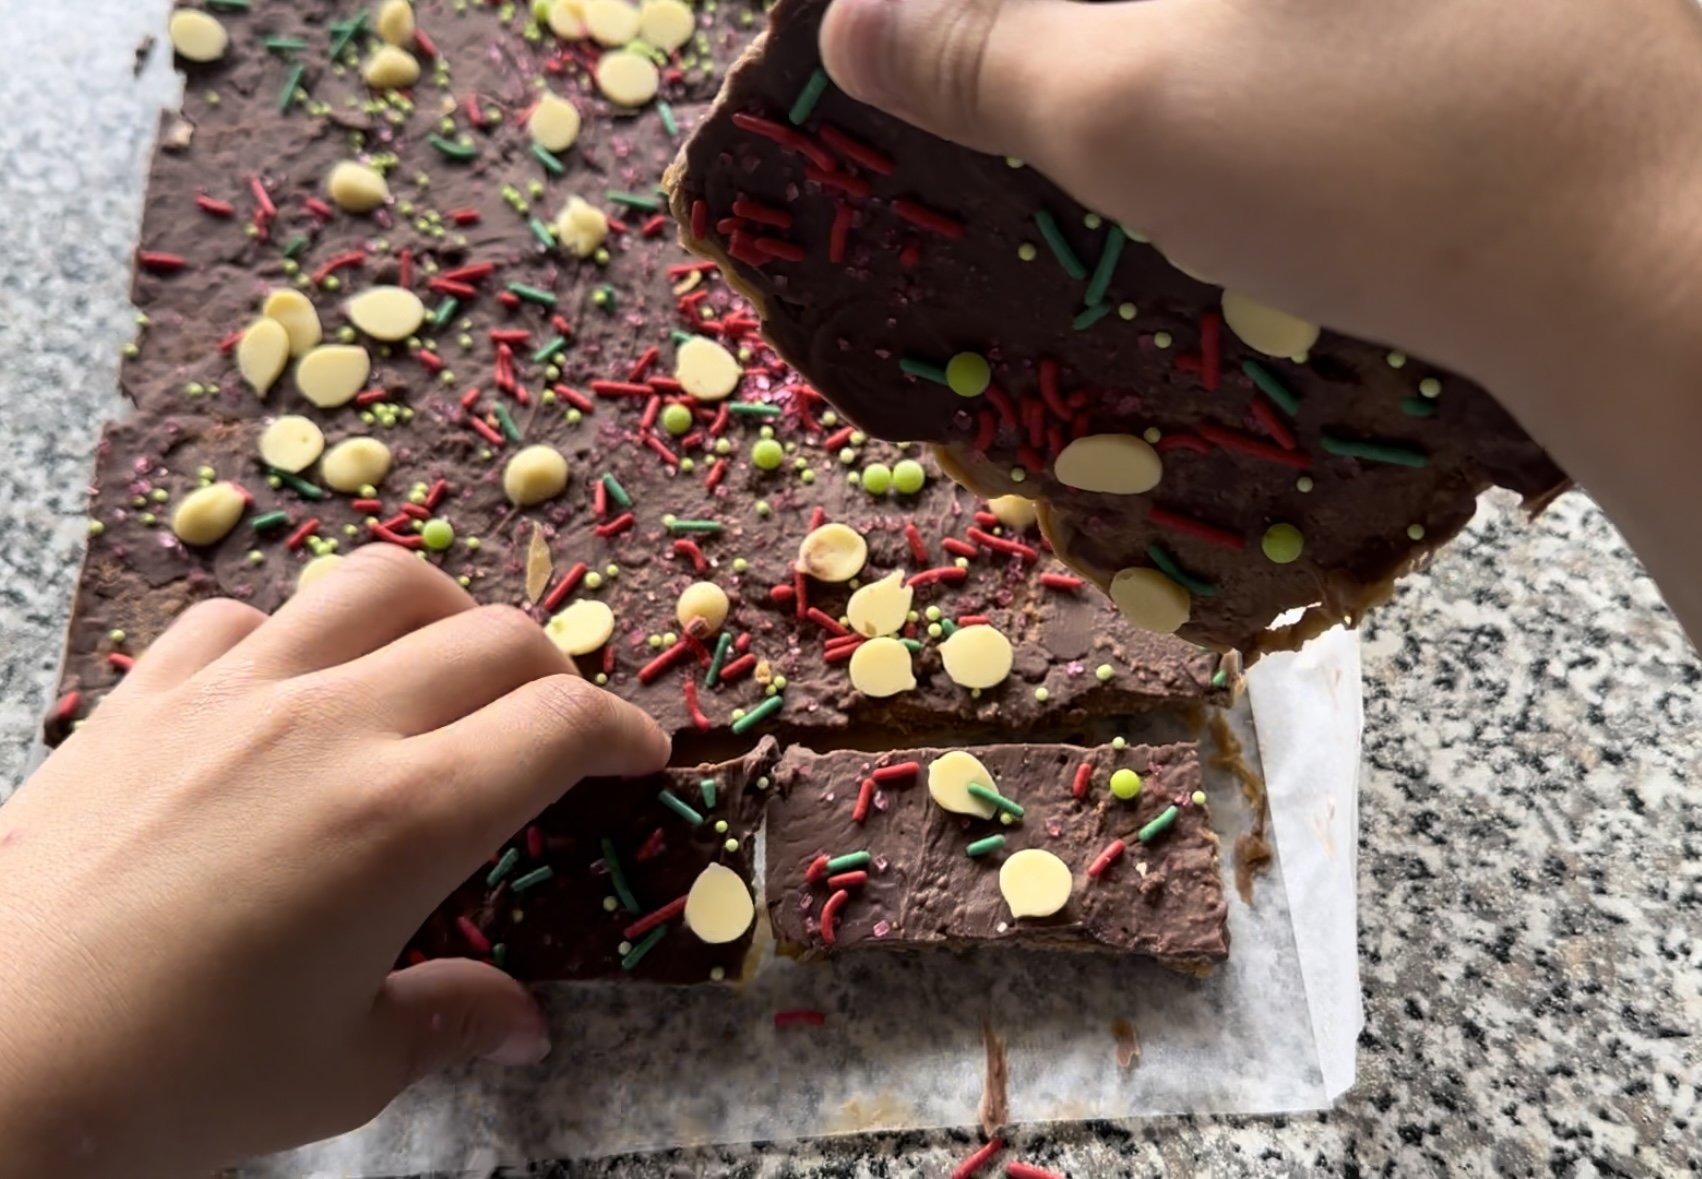
breaking up Christmas Crack
Pretzel Wreaths
In this house, we do festive! The kids love it, we love it and we get to a have a great big mess and absolute fun in between!
These are realy easy to make, you need a handful of ingredients, there realy is no big mess or massive equipment to clean up!

INGREDIENTS
Packet of Pretzel knots
1 Cup Chocolate - white ( to add colour to it)
Sprinkles, decorations
Melt your chocolate in short bursts in the microwave - 30 second did it for me and I stirred until it was nice and glossy! Mix in your preferred colour of choice, I did green and added two drops. I use a gel colour as I just love using gel. But it will work with whatever you have. Give that a good mix.
I put pieces of baking paper down on the table, put the pretzel knots in a bowl, the chocolate in a bowl and put the sprinkles down…and gave it to the kids!
I am sure you can come up with all sorts of exciting stuff, I have seen some realy cute pretzel reindeer! We just did the wreaths and little Maddy, well, she just did some chocolate blobs and tons of sprinkles!

Layered Brownie Cups
Who doesn’t want something guilty but yum! Why not pair both into one delish cup?
Made with some leftovers from your brownie baking mix, or even baked just for this, hey, I’m not judging!
I have made this a few times for the kids, and even once as a dessert for when my parents came over for a visit! It’s always a good hit and does the trick for something sweet after dinner!
STORAGE
This is the part, I can never answer! My kids tend to eat things in record time, except spinach? Go figure!
But, I would think, when making these, you would want to eat them almost immediately as the baked brownie mix, will go a bit soft and soggy if you keep it in between those layers!
Make everything in advance, and then just add them to your glass bowl, or serving containers just before you give them to your friends!

LAYERED BROWNIE CUPS
1 Chocolate Brownie Baking Mix
1 tub of cream
1 packet instant pudding / mousse
1 Tin Caramel
Berries
Mix and bake your brownie baking mix as per the instructions. I made mine in a bigger sheet pan so they baked thinner, and quicker! Let them cool!
Whip up your cream till it’s really nice and stiff! I had a after thought of adding crumbled Flake chocolate or Peppermint Crisp to this cream! ( Peppermint Crisp tart is made this way)
Make your instant pudding/ mousse!
Cut up your brownies into small squares, so they fit in the glass your using, at least a few pieces per layer.
Grab all your ingredients and start layering, this is really up to you and how you prefer!
Once finished put it in the fridge to chill! I had mine chilling for an entire day!
One of our dinner guests mentioned that this would look amazing in a big glass bowl, exactly like you would make a traditional trifle!
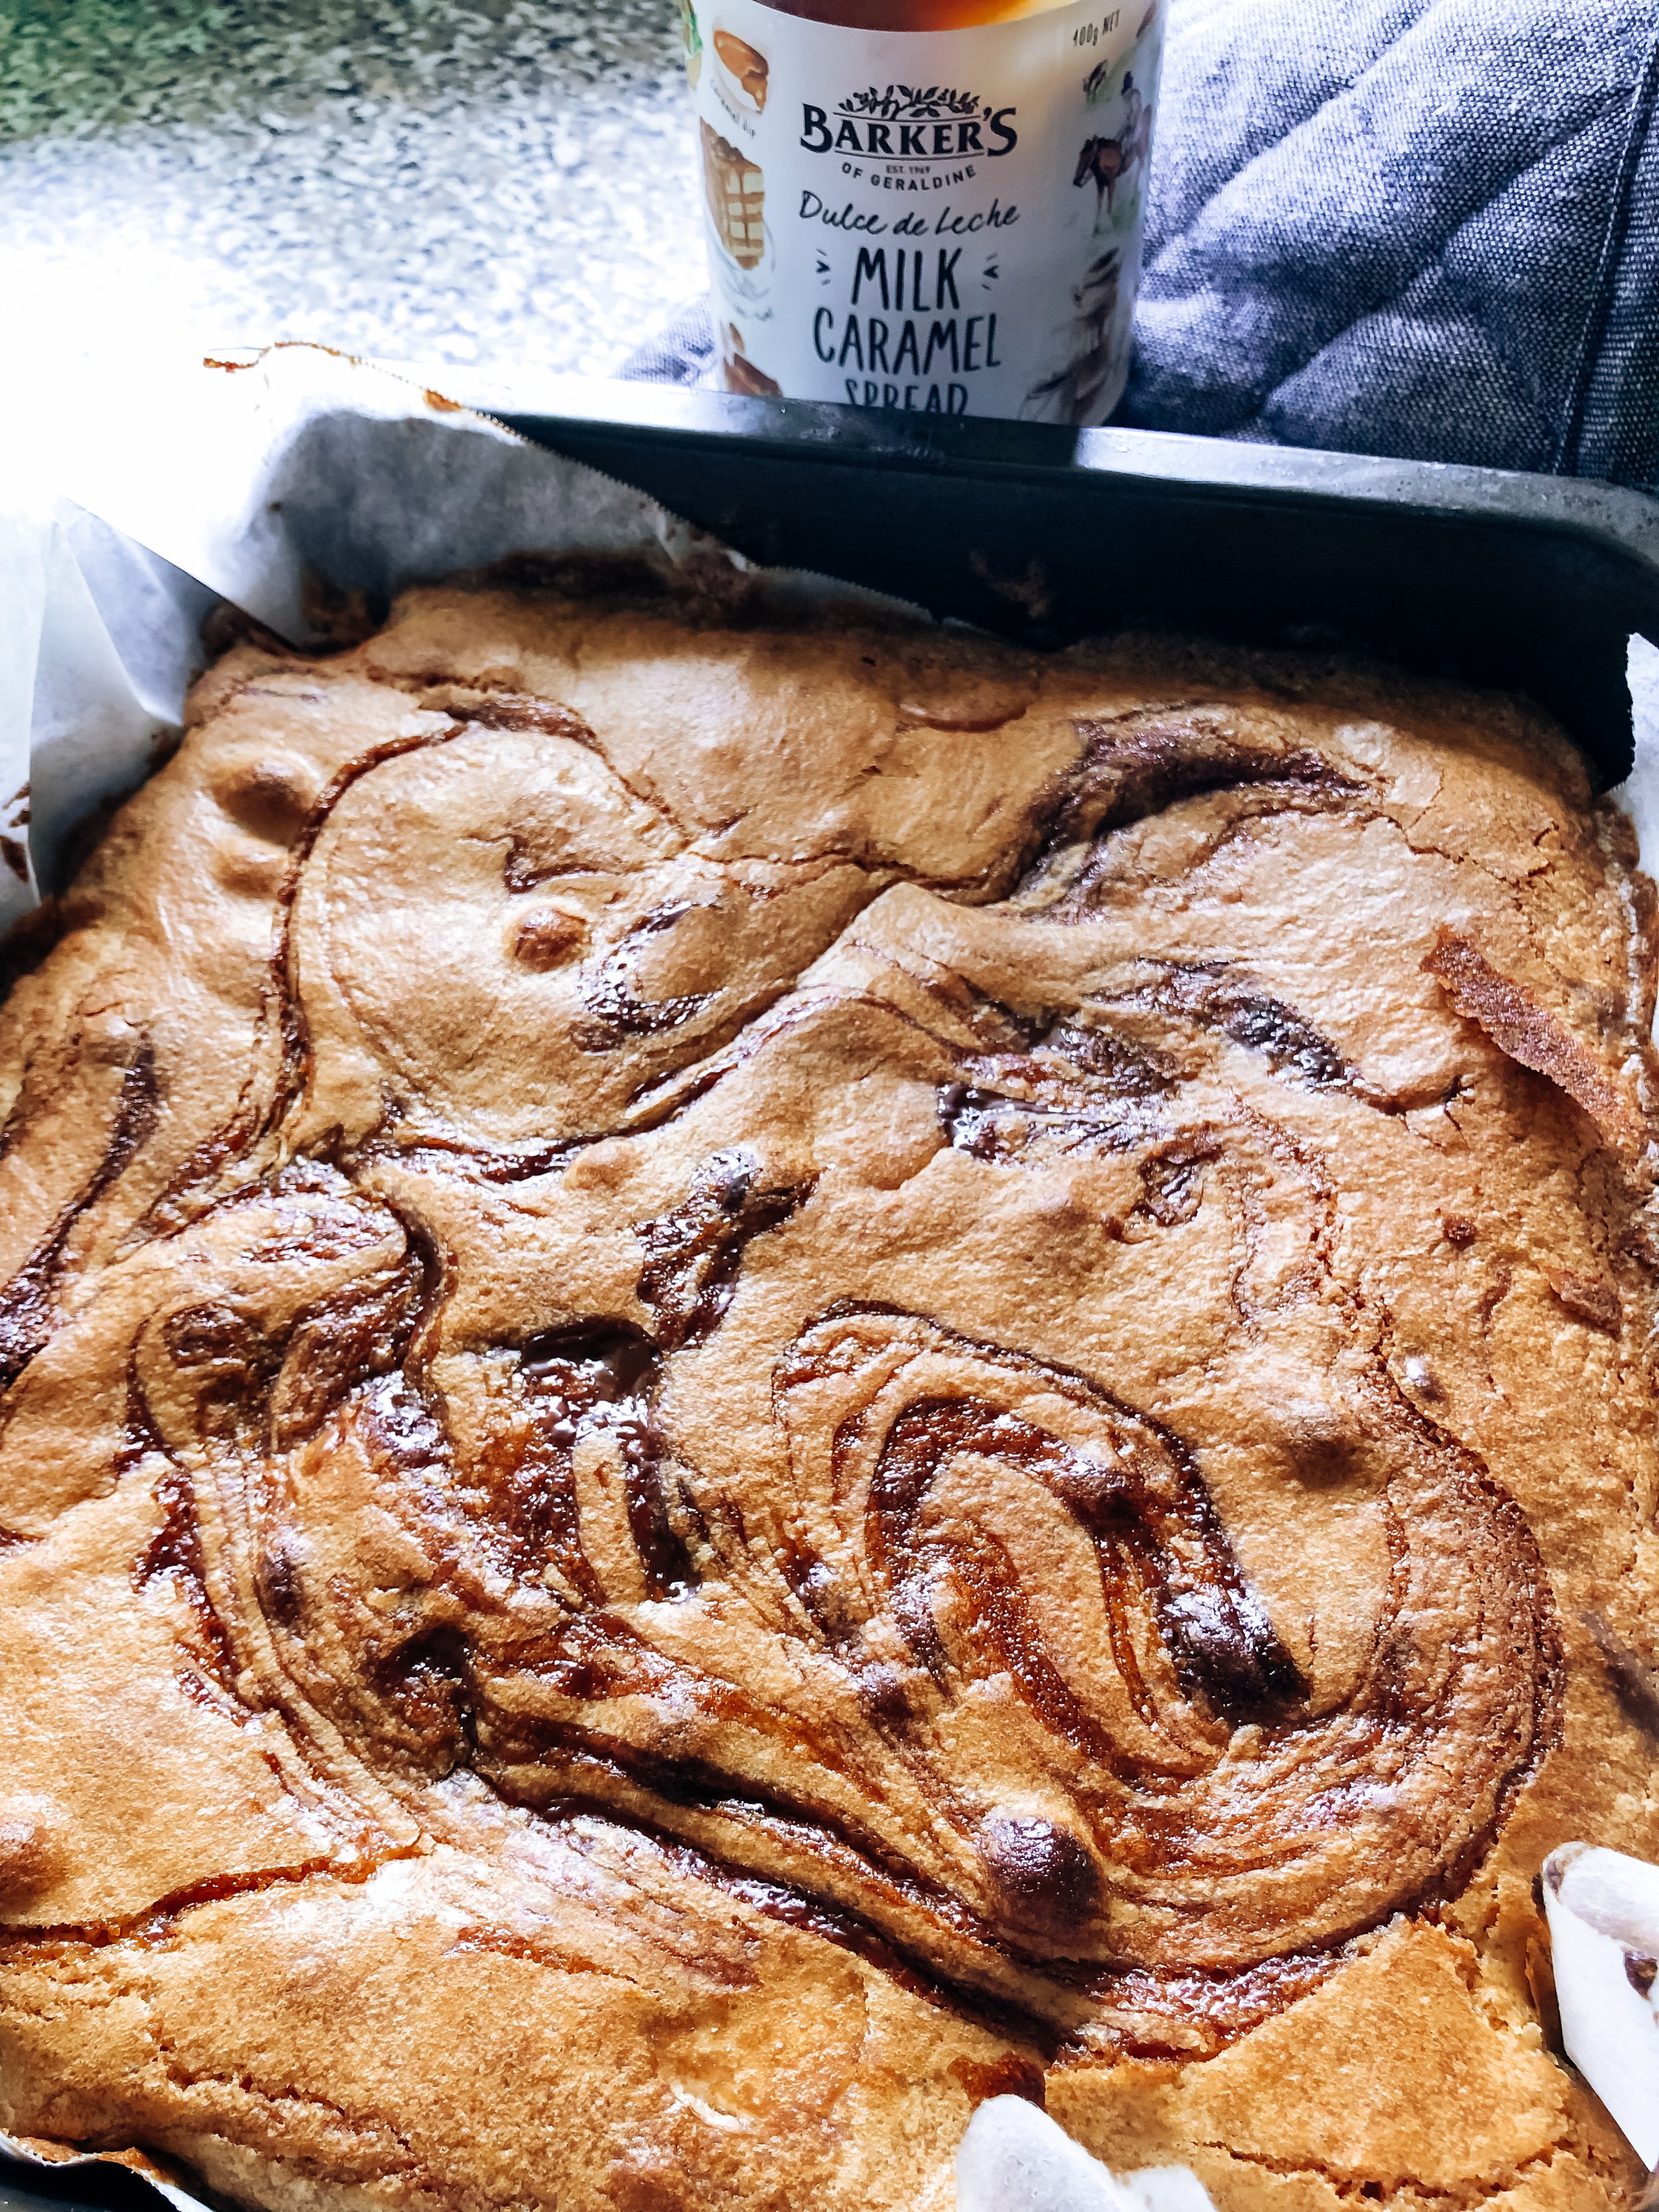
Dulce De Leche Blondies Mash Up
Right, there seriously is something about these blondies! The way the caramel from the combination of sugar and chocolate, caramelizes or it’s the slightly crunchy sides and tops combined with the soft gooey centers. Something, in here absolutely works and when you go and add things that have the same flavours, well, match made in baking mix heaven!
What is Dulche De Leche you ask?
Traditionally its made from cooking cow milk and sugar together! Now its made to resemble caramel and made much in the same way!
I made these to have a swirl on the top, but I have gone and gotten much better at making these and started to add a complete LAYER of Dulche de Leche in the middle! So when you cut into these morsels of caramelly deliciousness, you actualy have 3 layers! Bottom one being blondie, middle one being Dulche de Leche and the top one another blondie layer!
STORAGE
How about you go ahead and let me know how long they should last?? 🤣
But, I THINK they should do a good 5 days in an airtight container! I have also never tried to freeze them, however the blondies made as is on the back of the package, will freeze great and thaw amazing! I have tested them up to 2 months!
DULCHE DE LECHE BLONDIE SWIRL
1x Fudgy White Blondie Baking Mix
3 Tablespoons Dulce De Leche ( or almost a entire jar)
Preheat your oven to 180C
Line your baking tray with baking paper
Mix Blondie Baking Mix as per instructions
Add 3 tablespoons of Dulche De Leche and gently fold this into your baking mix while still in the mixing bowl in ( a few mixes will be fine) if you prefer to make layers, then add half the blondie mixture to the pan, add a nice layer of Dulche de Leche and then top it off with the rest of the blondie baking mix
Bake this according to your baking mix - 30 mins at 180C - let it cool down for at least 10 minutes before taking out of baking tin and cutting.
Dried Lemons - the perfect teacher gift!!
Perfect for your next Lemon and Lavender Cake… hint hint - we have the best vanilla cake mix!
These are even more amazing on the perfect cocktail or ice tea … whatever is your preference! 🍹
Another one of my favorite holidays recipes and pre-holidays vibes - I do sample a few new cocktail recipes - just to make sure they taste right!!
There really is no tip or trick to them, the only thing I find is the issue to use baking paper and a tray or straight onto the rack!
I use the oven rack and then cooling racks - however, my oven racks are quite wide and the smaller lemon slices tend to slip through the cracks !
So for these, I do add some baking paper and at about 1.5 hours in, I take the baking paper off, as they just don’t dry out enough! They need the heat and air from all sides!
We have a humidifier - and our light blew, we tried to make grapefruit and lemon slices and no matter how long we had it in they didn’t dry! So, I am definately still going to try that!
If you are looking for the perfect teacher gift or Christmas gift, this is it! I promise your teacher would love to have something she can use to unwind after a full day with kids!

Here you go….
INGREDIENTS
Lemonssssss
Oranges
Grapefruit
Limes
Whatever citrus fruit you have growing in abundance, or choose to use!
Put your oven on 90 C
Slice your citrus thinly, you can add a mixture of all of them, they all dry at the same time. I recommend you TRY and get them 0.5mm and all of them!
A mandolin I would think is your best bet - however, I just slice them with a knife and eye ball the thickness!!
Depending on the size of your lemons - they do shrink - either add them directly onto your racks or add baking paper and then put them onto the racks.
If you are using baking trays, you will need to add baking paper as they tend to get stuck to the tray as they dry out!
Place your racks back into the oven and set time for 1.5 hours. If you can take the baking paper out, do it other wise give them all a flip and return for another 1.5 hours.
After the times up, remove the ones that are done, dark caramel brown. Return the ones that are still yellow, sticky and just not done! Give them 30 minutes at a time extra.
Let them cool down completely and store them in a airtight container! I store mine in the pantry in a plastic container.
Bottle them up in a nice glass jar and if you have some extra crafty tools, add a nice little sticker to the front for gifting and do pair it with a baking mix! The perfect teacher gift!
Chocolate Chip Cookies - Low Carb Keto Variation
I do not know anyone who does not like a Chocolate Chip cookie! Seriously, do you?!
The perfect salty cookie crunch to the sweet gooey chocolate chips, it’s delicious served with tea, as a snack or honestly just when you walk past the cookie jar - just take one, no one is looking !
So many of my friends love these cookies, they have adapted the recipe for all sorts of ad ins! My favorites from there lists, white chocolate chips and cranberries, white chocolate and cashews and caramel chip pieces! I will be sure to get the recipe from them and update this!
Chocolate Chip cookies realy are a simple pleasure in life!
STORAGE INSTRUCTIONS
Store in a airtight container for up to 3 days
YES FREEZE THE DOUGH!
Make one batch and half it or make a double batch and freeze the other! You don’t even have to thaw out the dough! Just add 2-4 minutes to your baking time! PLEASE CHECK YOUR COOKIES AFTER 2 MINUTES!

CHOCOLATE CHIP COOKIES
1 Egg
1 TBLS Coconut Oil - or butter
1/4 Cup Peanut Butter of choice - I prefer chunky
3 TBLS Maple Syrup - or sweetener of choice
1/4 Cup Brown Sugar - or sugar of choice
1 TSP Vanilla Extract
1 Pouch ORIGINAL NUT FLOUR Baking Mix
1/2 Cup Chocolate Chips - I prefer slabs chopped into chunks - or no sugar chips
Optional Sea Salt Flakes for sprinkling on top
Line your baking sheet with baking paper and pre-heat your oven to 180C
Whisk together the egg, *maple syrup, melted coconut oil/butter *sugar, peanut butter and vanilla extract.
Add the pouch to the wet mixture and then add the chocolate chips/chunks into the this mixture. Give this a thorough mix until its all combined and mixed through. I prefer to chill this cookie mixture in the fridge for 30 minutes before handling it, however not necessary at all. * If you are freezing your dough, roll it out into a log shape and cover with cling wrap and a layer of tin foil. When ready to bake remove from freezer let it sit for a few minutes and cut off your desired amount of cookies 1-2cm thick and bake and remember to add to your baking time as mentioned above!
Use 2 TBLS worth of dough per cookie, roll out ruff balls and place onto the tray. Feel free to flatten them out with a spoon or a fork, I prefer to squish them slightly but still leave them nice and chunky!
These have been made to be irregular, chewy and imperfect cookies!
Bake for 10-12 minutes (depending on your thickness) if using salt flakes, add these directly after baking and leave to cool in tray for a few minutes before transferring to a wire rack to cool completely
🍩 My FAVORITE chocolate Ganache receipe 🍩
Ganache is one of those best kept secrets that seriously should not be a secret!
It’s a two ingredient secret weapon thats heated and stirred until it’s silky and smooth and an amazingly beautiful rich colour!
It’s not only quick and easy, just as I like it, it’s uniquely versatile.
Its perfect for layering in between cake layers, covering cakes, cupcakes and donuts! Using it as a dipping sauce ( strawberries anyone)for churros and even sugar cookies! It works amazing to pour over brownies and ice cream or even your christmas pavlova! It’s an endless list of what you can do!
Like I said- chocolate ganche should not be a secret and most definately a receipe in any households arsenal!!

I know there are allot of receipes that tell you to use certain chocolate chips and certain chocolate for ganache. I have never had a problem with any chocolate I have used. I do tend to use a chocolate that I love!
For this I used a Nestle Milk Chocolate and normal pouring cream.
The only “issue / difference” that I find is when I used a chocolate chip/ compound it doesn’t always melt as thoroughly as others.
Tips and Tricks
if your chocolate doesn’t melt all the way through after you added it to the cream - I prefer to give it a quick whizz with the hand blender and being careful not to incorporate any bubbles
Chop your slab chooclate into smaller pieces - this helps it melt easier
Cool the ganache considerably before you use it to pipe onto cakes/cupcakes
Let the chocolate and warm cream sit for a few minutes after you have added them together- the warm cream starts melting the chocolate

Chocolate Ganache Receipe
For me, I prefer to keep it to the basic 2:1 ration! 2 parts chocolate and 1 part cream
80g cream
160g chopped chocolate
To cover a large bundt cake ( as pictured below)
warm your heat proof bowl in the microwave ( dont ask why as you warm the cream in this bowl to - this is just how Ive always done it)
Add your 1 part cream ( this video I used 80g) so add 80g cream and warm it up - 1 minute will do
Add your chopped chocolate ( again this video) 160g of chopped chocolate or your chocolate chips
Let it sit for 30 seconds and start to stir, be careful not to add bubbles or stir vigorously! ( you can see I did not follow my own advice here as I was in a hurry!) It will combine!
Stir slowly and before you know it the chocolate and cream will have combined
Let it cool slightly before you use it - I like to start using it for cakes ect when it looks like a peanut butter consistancy
Cake mix used for this Chocolate Bundt cake is the very same Cake/Cupcake Mix that is used in the Cake Kit!


Halloween Brownies
When Halloween rolls around, as it does every year I tend to find myself getting excited to get the kids costumes and make up some yummy treats!
This time I chose to make Chocolate Brownies and added some ooey gooey melted marshmallows to make the cobwebs and for extra spookiness we added some candy eyeballs! If you prefer the Fudgy Blondies it will work perfectly well, too!
I am not going to lie, this is going to be slightly messy, especially if you are going to get your kids involved and helping out with the marshmallow cobwebs. But hey, I spose this is what its all about! Having fun with the kids in the kitchen and making some amazing memories while doing it! I am absolutely NOT GOING to judge if you pour yourself a glass or two, it does help with cleaning the mess afterwards!

Halloween brownies with some sticky helping hands
This recipe doesn’t ask for many ingredients or time - just a bit of sticky hands!
Marshmallows - white
Spooky additions - candy eyes, sour worms, cookie crumbs
SERVING SUGGESTIONS
Try using anything you can think of, I named a few suggestions above and cut the brownie slab into squares, rectangles or however your prefer and fits your ideas
This slab will last up to 5 days in a airtight container, if you want to give it a quick burst in the microwave to warm it up, do it! Just remember to watch what you have added to the tops so they dont burn/melt!

Halloween Brownie Slab
HALLOWEEN BROWNIE SLAB
1 X Chewy Chocolate Brownie Mix
Handfull of marshmallows - white
Candy eyes, worms, fingers, whatever goolish lollies you have!
Mix your brownies as per instructions
Leave to cool completely and don’t cut, yet!
Melt marshmallows in heat proof bowl for 30 seconds, once cool to touch, squish them in between all your fingers tips. Pull your fingers and hands apart to make webs. Put these webs onto your brownie slab and continue until you have the desired amount!
Now add your goolish treats and cut to the size you need!
WA LA - Halloween the easy way!
How Chocolate Brownies Can Boost Your Mood
If you're craving a sweet treat that not only satisfies your taste buds but also boosts your mood, look no further than chocolate brownies. These delectable desserts are more than just a guilty pleasure; they actually have science-backed benefits for your emotional well-being.
The secret lies in the power of chocolate. Known for its mood-enhancing properties, chocolate contains compounds like phenylethylamine and serotonin, which can stimulate the release of endorphins, the feel-good hormones in our brain. Combining chocolate with the comforting texture and rich flavor of brownies creates a double dose of happiness.

But it's not just the chocolate that makes brownies so satisfying. Research suggests that the act of baking and indulging in homemade treats can increase feelings of relaxation and contentment. The process of mixing ingredients together, and waiting for the brownies to bake can be therapeutic and stress-reducing. And when you finally bite into that warm, gooey brownie, the reward centers in your brain light up, further boosting your satisfaction.
So, the next time you're feeling down or in need of a little pick-me-up, consider reaching for a chocolate brownie. Indulging in this sweet treat might just be the science-backed remedy to brighten your day.
Food has always had a powerful impact on our emotions. We often turn to comfort foods when we're feeling down or stressed, seeking solace in the familiar flavors and textures that bring us comfort. But what if there was a scientific reason behind why certain foods make us feel better?
Chocolate, has long been associated with feelings of pleasure and happiness. This is due to its unique combination of compounds that have a direct impact on our brain chemistry. Phenylethylamine, for example, is a compound found in chocolate that stimulates the release of endorphins, the feel-good hormones in our brain. Serotonin, another compound found in chocolate, acts as a mood enhancer, promoting feelings of relaxation and contentment.

Now that we understand the psychological effects of chocolate, let's take a closer look at the ingredients that make brownies such a mood-boosting treat. The key components are cocoa powder and chocolate chips. Cocoa powder is rich in flavonoids, which have been linked to improved mood and reduced symptoms of depression. Chocolate chips, on the other hand, provide an extra dose of chocolatey goodness, intensifying the overall flavor and satisfaction.
The combination of chocolate and the comforting texture of brownies creates a double dose of happiness. When we consume chocolate, it stimulates the release of endorphins in our brain, which are responsible for feelings of pleasure and well-being. Additionally, the act of baking and indulging in homemade treats can increase feelings of relaxation and contentment. The process of measuring out ingredients, mixing them together, and waiting for the brownies to bake can be therapeutic and stress-reducing. And when you finally bite into that warm, gooey chocolate brownie, the reward centers in your brain light up, further boosting your satisfaction.
To truly understand why chocolate brownies can boost your mood, it's important to delve into the science behind mood regulation. Serotonin and dopamine are two neurotransmitters that play a key role in regulating our emotions. Serotonin is often referred to as the "feel-good" hormone, as it helps to promote feelings of happiness and well-being. Dopamine, on the other hand, is associated with pleasure and reward. When we consume chocolate, it can increase the levels of serotonin and dopamine in our brain, leading to an overall improvement in mood.
Now that we know the science behind why chocolate brownies can boost our mood, let's explore how we can make these mood-boosting treats at home. You can grab one of Flour and Dough easy to mix and easy to bake baking mixes and bake it in your own home. Fresh from the oven and ready for an endorphin filled happy vibe!
Tips for incorporating mood-boosting foods into your diet
Now that you know the mood-boosting properties of chocolate brownies and other foods, here are some tips for incorporating them into your diet:
- Enjoy in moderation: While these foods can have a positive impact on your mood, it's important to enjoy them in moderation. Too much of a good thing can have negative consequences, so be mindful of portion sizes.
- Pair with other nutritious foods: To create a balanced diet that supports your overall well-being, pair mood-boosting foods with other nutritious options, such as lean proteins, whole grains, and plenty of fruits and vegetables.
- Get creative in the kitchen: Experiment with different recipes and ingredients to keep things interesting. Try adding berries to your morning oatmeal or incorporating nuts and seeds into your salads.
- Practice mindful eating: Slow down and savor each bite. Pay attention to the flavors, textures, and sensations of the food you're eating. This can enhance your enjoyment and satisfaction.

In conclusion, Flour and Dough chocolate brownies are more than just a tasty treat; they have the power to boost your mood and uplift your spirits. The combination of chocolate's mood-enhancing properties and the therapeutic act of baking and indulging in homemade treats creates a double dose of happiness. So, the next time you're feeling down or in need of a little pick-me-up, consider reaching for a chocolate brownie. Indulging in this sweet treat might just be the science-backed remedy to brighten your day.
Remember, moderation is key, and it's important to maintain a balanced diet that includes a variety of mood-boosting foods. So go ahead, treat yourself to a delicious chocolate brownie and enjoy the benefits it brings to your emotional well-being.
8 Secrets on how to make box (pouch) brownies awesome
Box or in my case, pouch brownies always get a bad rep! They are made to be cheap, easy and quick so major food producers whip them out as a add on to an already great line! But this, gives them the terrible feedback they seem to be getting!
I am writing this to convince you, that not all box (pouch) brownie mixes are the same! Small, local companies like Flour and Dough, make ours the way you would at home, with good ingredients, loads of chocolate chips and just the right amount of everything!
These Chewy Chocolate Brownies are made to be chewy, gooey and fudgy and loaded with yummy chocolate pieces, that when baked and melted are still there and not disintegrated into nothingness!
This baking mix, will taste like they came from the best bakery in town, I promise!
If you still don’t believe me, here are a few more tips on how to make your brownie baking mix, better than ever!

1 - START WITH FLOUR AND DOUGH CHEWY CHOCOLATE BROWNIE MIX
This is a easy one, right? Obviously, it’s a blog about Flour and Dough baking mixes, brownies to be exact!
2 -WE USE BUTTER AND NOT OIL
DONT EVER USE OIL!! That’s it, don’t you dare do it!
Butter adds a certain richness and depth to your brownie. Ever had a slice of cake and it left you with that horrible oil taste in your month…think of that when reaching for you oil when trying to make a batch of brownies!
3 - EGGS
Now, being in New Zealand and currently struggling to keep up with the prices of eggs, I know this is a hard one. But don’t replace eggs for something else, use eggs. Use the amount of eggs as suggested on the baking mix, if you really want to add one more, you can, but remember it will need to bake longer and it will be more cake like. Eggs help to give that perfect crack on the top of the brownie.
That look that just screams, professional!
4. DO NOT OVER MIX YOUR BAKING MIX
Now, I have said this before, I say it on the back of the baking mix, don’t do it. It makes the batter dense, thick and just not airy. Your brownie will come out, thick, clunky and hard!
All you need to do is mix until you have no dry parts left, that’s it, now scrape it into your baking pan!

5. COOK THEM LOW AND SLOW
Now this is something that I love to do! Cook them on a lower heat, say 160 degrees C, and then push up the time between 40 and 50 minutes - depending on your oven. This makes them even fudgier! I dont even think that’s a real word, but it works here!
NOW COMES THE PART WHERE I TELL YOU THAT ITS OK TO ADD THINGS - YES IT REALY IS

6. ADD COFFEE
Who doesn’t want a brownie that’s rich and extra chocolaty? Add 1 teaspoon of coffee to a small amount of water, you don’t want to make your brownies watery. Stir it up and add it to the brownie batter.
You know that coffee and chocolate are a match made in heaven, right? Coffee intensify’s the flavour of chocolate, it makes it deeper, richer.
7. ADD MARSHMALLOWS, PRETZELS, PEANUTS,CRUSHED COOKIES, M&M’s….
You get what I am trying to say here?! Add whatever you like, to the batter, even sprinkle some on top! Give it a swirl of peanut butter or my personal favorite some Biscoff!
8. AGAIN, I AM TELLING YOU IT’s REALY OK TO MAKE SOMETHING ELSE FROM YOUR BROWNIE BAKING MIX
Make a brownie cake, tart cups, brownie crust for your favorite cheese cake…this is topic for a different day, but go ahead, experiment and you will be pleasantly surprised!
So go on, have some, get the kids involved and make some awesome memories, and some amazing brownies too!
chocolate brownie recipes for Valentines Day - from a baking mix
Oh my goodness, Valentines Day! So, New Year is done, and now we start with all the special days, I honestly can’t believe it!
For Valentines Day I like to do a special dinner for the family and then get the kids involved in making desserts and little paper garlands, hanging balloons and doing the overall pink and red heart decorations!
This year will be no different! We have decided on doing chocolate brownies, a little different this year!
I have made these before and for me the best way to do it is to make the brownies ahead of time as they need to be super duper cool to add the ice cream, otherwise that will become one great mess! Prep everything and then use the same heart cutter to cut out the ice cream and sandwich in between the two brownie layers! Keep in the freezer while your making the rest! It helps to keep the ice cream frozen but won’t freeze the chocolate brownies!

For a special treat we are doing chocolate brownie hearts filled with ice cream and dipped into chocolate and rolled into crushed hazelnuts!
It seems like a lot of work when looking at it, but honestly, it’s not! The ice cream is store bought, for the brownies I use the Flour & Dough baking mixes, it’s important to use a good brownie mix that tastes great as this really is the winner here, and chocolate chips to melt and dip! You can use whatever ice cream and nuts or sprinkles, or whatever you really feel like! I prefer vanilla ice cream as it doesn’t take away from the chocolate brownie flavour and hazelnuts, as hazelnuts and chocolate are just the best!
Remember that these ice cream filled chocolate brownies need to be served immediately, I don’t recommend freezing them for longer than 30 minutes!!
This really is the best brownie recipe, you can use this baking mix to make a lot of special treats for your family! It doesn’t use a ton of pantry stuff and doesn’t take hours to make! We love doing all sorts of interesting things to this mix!
Here are a few more ideas that I found that you can use to make brownies a little more special!