
FROM BREAD TO CHOCOLATE BROWNIES - ALL THINGS INTERESTING
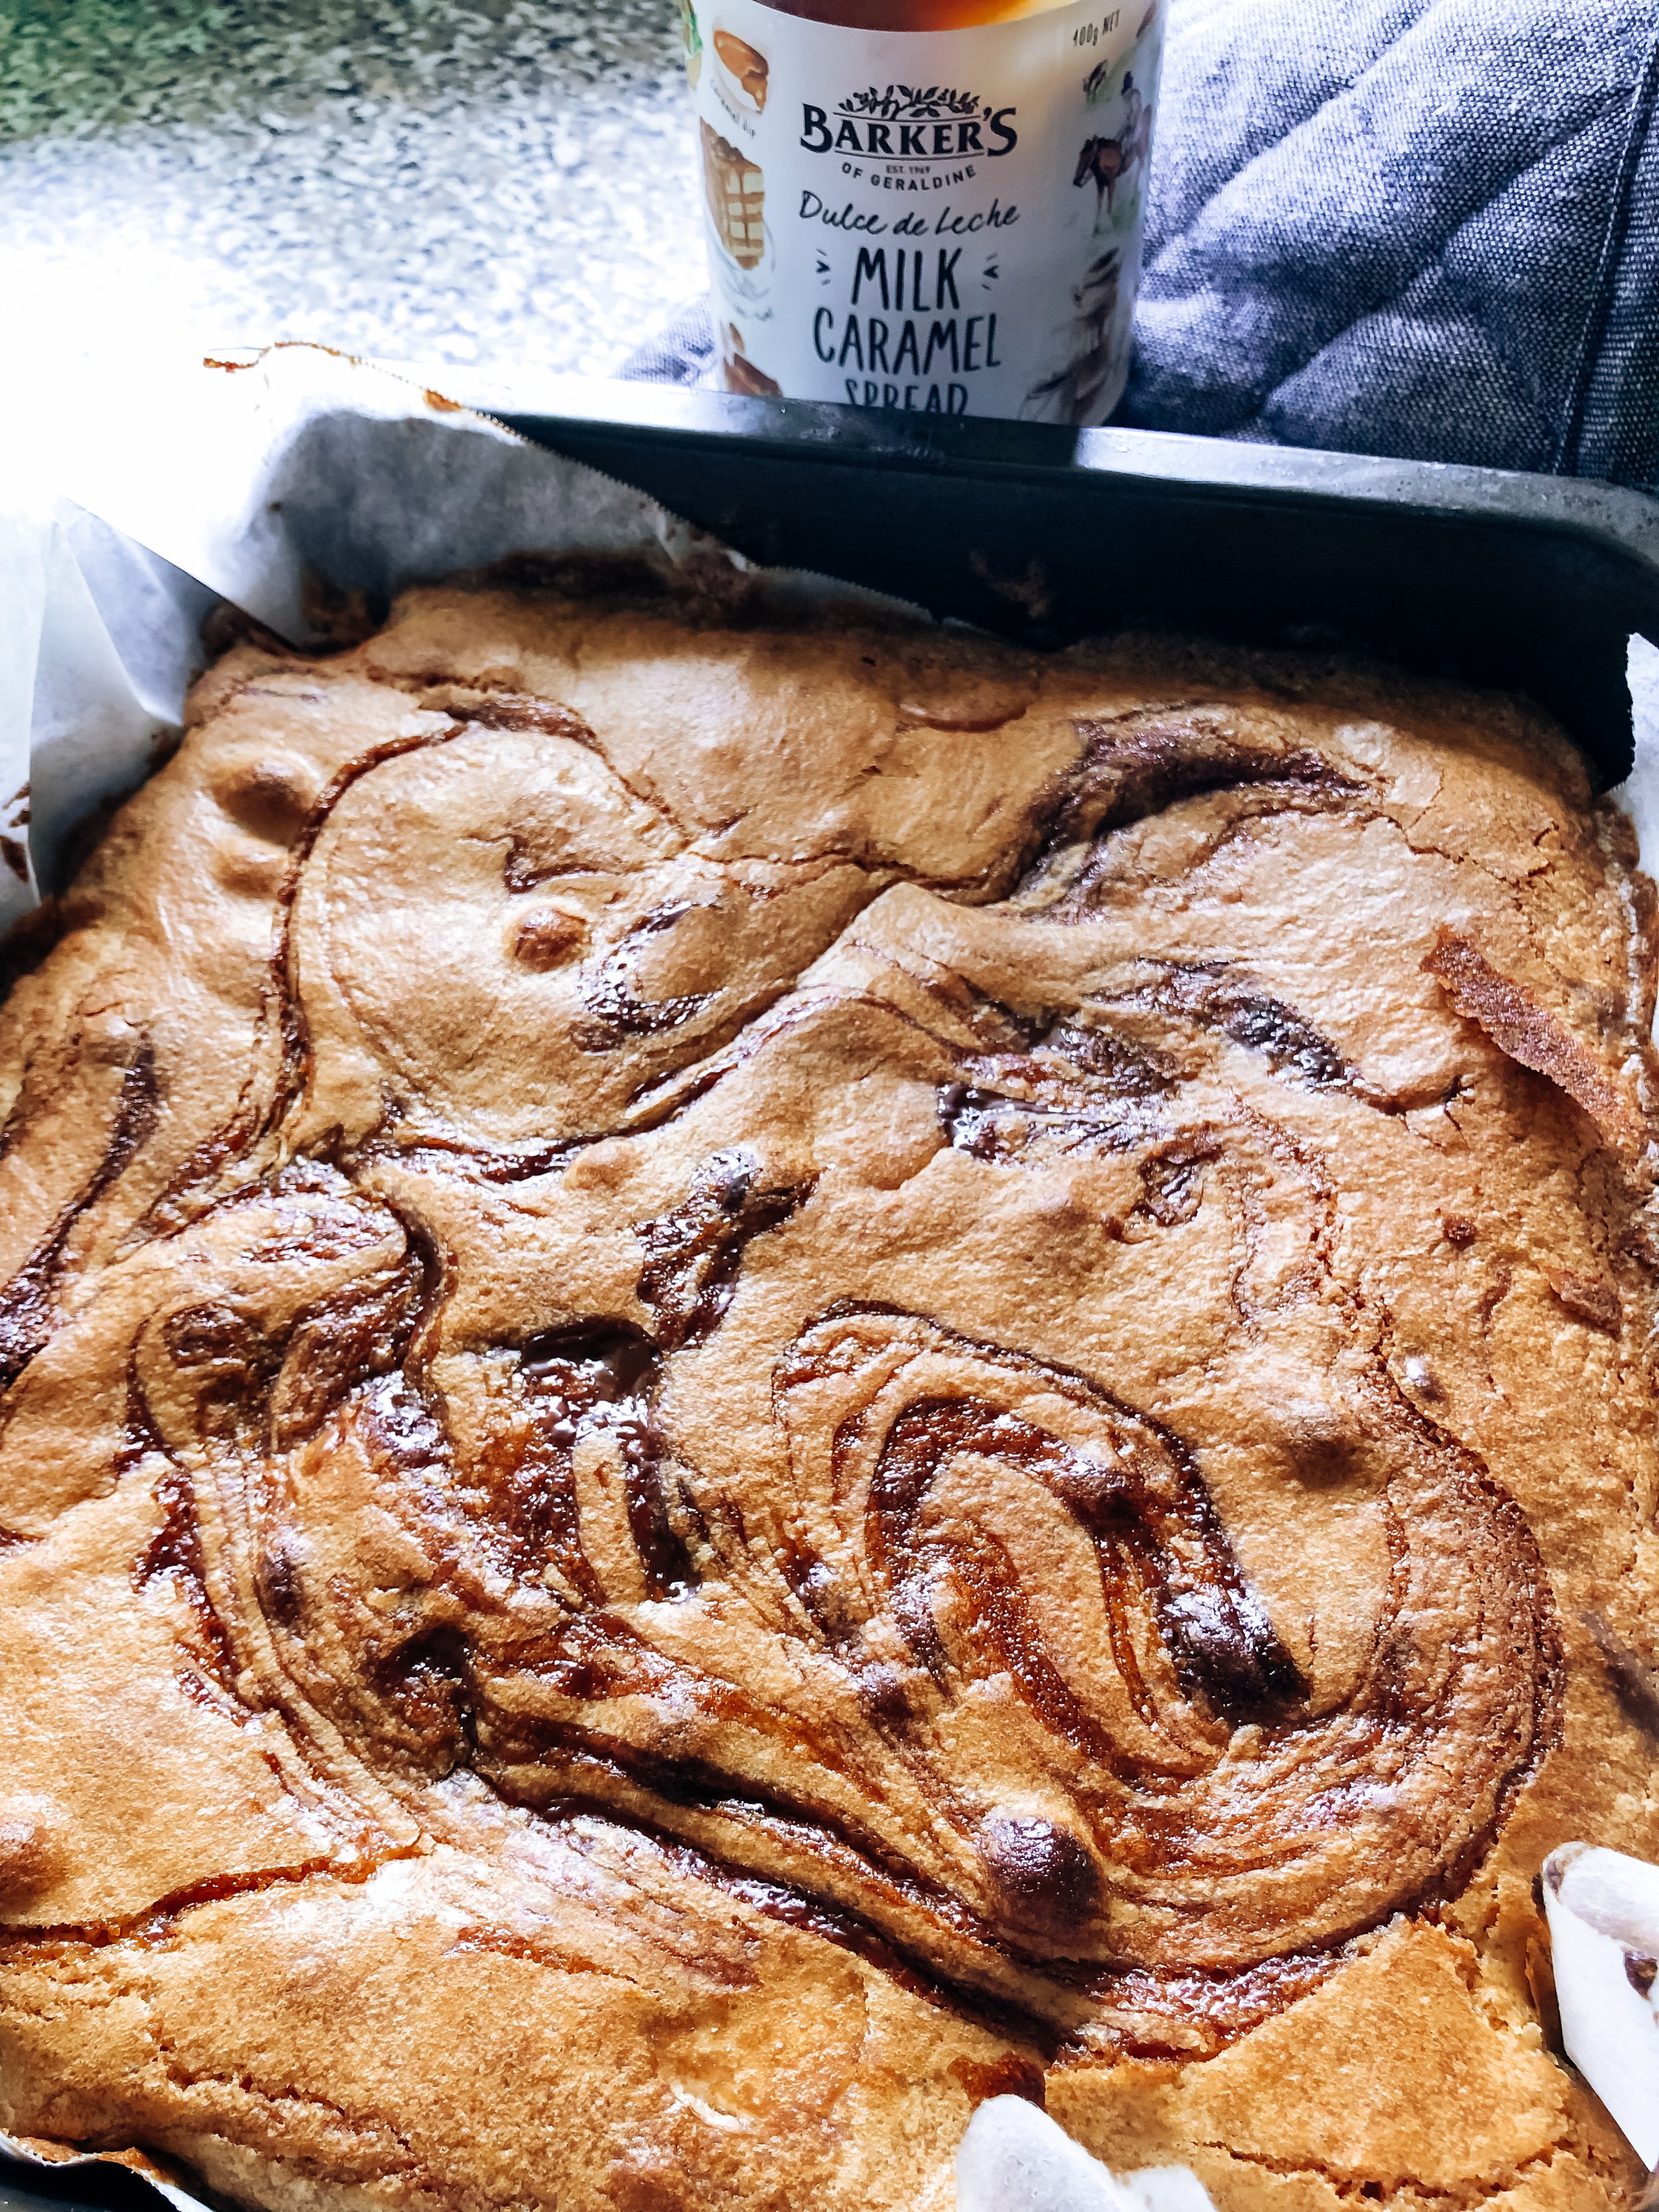
Dulce De Leche Blondies Mash Up
Right, there seriously is something about these blondies! The way the caramel from the combination of sugar and chocolate, caramelizes or it’s the slightly crunchy sides and tops combined with the soft gooey centers. Something, in here absolutely works and when you go and add things that have the same flavours, well, match made in baking mix heaven!
What is Dulche De Leche you ask?
Traditionally its made from cooking cow milk and sugar together! Now its made to resemble caramel and made much in the same way!
I made these to have a swirl on the top, but I have gone and gotten much better at making these and started to add a complete LAYER of Dulche de Leche in the middle! So when you cut into these morsels of caramelly deliciousness, you actualy have 3 layers! Bottom one being blondie, middle one being Dulche de Leche and the top one another blondie layer!
STORAGE
How about you go ahead and let me know how long they should last?? 🤣
But, I THINK they should do a good 5 days in an airtight container! I have also never tried to freeze them, however the blondies made as is on the back of the package, will freeze great and thaw amazing! I have tested them up to 2 months!
DULCHE DE LECHE BLONDIE SWIRL
1x Fudgy White Blondie Baking Mix
3 Tablespoons Dulce De Leche ( or almost a entire jar)
Preheat your oven to 180C
Line your baking tray with baking paper
Mix Blondie Baking Mix as per instructions
Add 3 tablespoons of Dulche De Leche and gently fold this into your baking mix while still in the mixing bowl in ( a few mixes will be fine) if you prefer to make layers, then add half the blondie mixture to the pan, add a nice layer of Dulche de Leche and then top it off with the rest of the blondie baking mix
Bake this according to your baking mix - 30 mins at 180C - let it cool down for at least 10 minutes before taking out of baking tin and cutting.
KETO CRACKERS - from our baking mix
One of the most looked at recipes from 2023! I wonder how many of you are going to have this on your Christmas platter this year….
When you think of a cracker, for your cheese platter or even a yummy scrumptious dip…what comes to mind?
A sturdy cracker that can handle the DOUBLE DIP, one that can scoop enough dip and a cracker that can withstand the load that your loading onto it! Right?!!
If any of this, rings any bells for you, then this, this is the perfect cracker for you! Guess what, its also Keto! Because I have made it using our Flour and Dough baking mixes! The most versatile mixes ever!
There realy isn’t much to the recipe! You will need 3 tablespoons of butter and some water and most definitely a rolling pin or something resembling a rolling pin…that empty bottle of wine maybe?
I love using them for cheese platters, as they can be cut to any shape you want, ie long rectangle so you can add them to a glass standing all up and pretty, or smaller squares laying flat! However you please, really!
I like to use the Rosemary Garlic and Thyme baking mix, but I have done it with the Pumpkin and Cashew baking mix too! I did, give the nuts and seeds a bit of a bash, with said rolling pin, as I found them a bit thick to roll the cracker to my preferred thickness! But hey, you do you!
EXTRA FLAVOURS
Some flavours I think will be great if you use them alongside the Original Baking Mix - just add them into the mix while mixing!
chilli and garlic spice
smoked paprika
cracked pepper

STORAGE
Store in a airtight container for up to 3 days!
I have never tried to freeze them, but I have frozen the baking mixes when made into loaves, muffins etc I realy dont know if they would be crisp when thawed.
Keto Cracker
Ingredients
1 Pouch - Rosemary Garlic and Thyme or Original Nut Flour Baking Mix or Pumpkin and Cashew
3 TBLS Melted Butter
1/4 Cup Water
Preheat your oven to 170 degrees
Add melted butter and water to the chosen mix and mix until all combined and a dough is formed.
Shape the dough into a ball and then divide into two pieces
I like to roll mine out between two pieces of baking paper, roll out each ball until they are about 2mm thick. The thinner the cracker the crispier and nicer to eat!
Sprinkle some coarse salt on top and give one more light roll with your rolling pin, just so that the salt sticks at the top!
Transfer the baking paper with your dough on top to your baking sheet and bake for 8 minutes. Remove your baking sheet and cut your crackers into squares/rectangles, I used my pizza cutter for this! But feel free to use whatever you have handy.
Turn them around and bake for another 8 minutes, you do want them slightly brown on the edges!
Voila! Keto Crackers from a bread mix!
Use the Original and add your own flavours! Try using the other mixes too! You will need to bash up the nuts and seeds before you try !
Christmas Tree Brownies
Christmas, rightly named the silly season!
We bake, we put up the tree, we decorate the house and the garden and the fence… you get it, right?!! We even tell the kids they need to behave so Santa can bring around some gifts… 🤣 yes, I see you and I hear you!!
This is one of those receipes that you just cannot not add to your endless elbow long list of things to do!! It deserves a space in your life!
It adds a smile to everyones face and the kids just love getting involved with the entire process and by using one of our baking mixes, well, it’s become that much easier!
You have 5 minutes of hands on time and 30 minutes in the oven … the cooling down time takes longer than this!

Tips and Tricks
Do wait until they have cooled down completely… your icing will just melt off if you don’t!!
Cut them smaller rather than bigger triangles - they become too heavy for the little candy cane trunks
Dont worry if you dont have icing bags, just slather the icing on all over like a cupcake - it does the same thing and still looks like a tree!
Storage Instructions
Air tight container for 3-4 days - however mine didnt last that long!
You can absolutely freeze them - I would recommend you take out the candy cane - or leave it out completely! Just thaw before you eat!

These are such a fun treat to share on your Christmas dessert table, as a realy fun snack or if your like me- I added one to the lunch box this morning - quitely waiting for my email to scold me for adding sweat treats to school today… but it was worth it!!! His face when he got home today telling me about getting THAT surprise ❤️
Ingredients
1 x Packet Flour & Dough Chewy Chocolate Brownie Mix
10 - 15 Candy Canes
Small Batch Icing (1/2 cup icing sugar - 1/4 cup butter -1 tablespoon milk)
Green Food Colouring
Sprinkles/ Decorations of choice
Pre heat your oven to 180C and line your baking tin
Mix baking mix as per instructions and let it cool for at least 10-15 minutes before cutting
Cut your brownie mix into thirds and then cut each strip into triangles.
Cut the corner section off of the candy cane ( so you are left with only the straight piece) and insert the cut end into the brownie on the bottom end of the triangle to make the trunk of your Christmas tree.
Let these cool completely before adding your icing sugar – otherwise it will melt right off!
Use a piping bag, fill with your icing and cut a small piece off the end of the bag, and pipe your desired pattern onto your brownie trees! Decorate with sprinkles!
Have fun!!
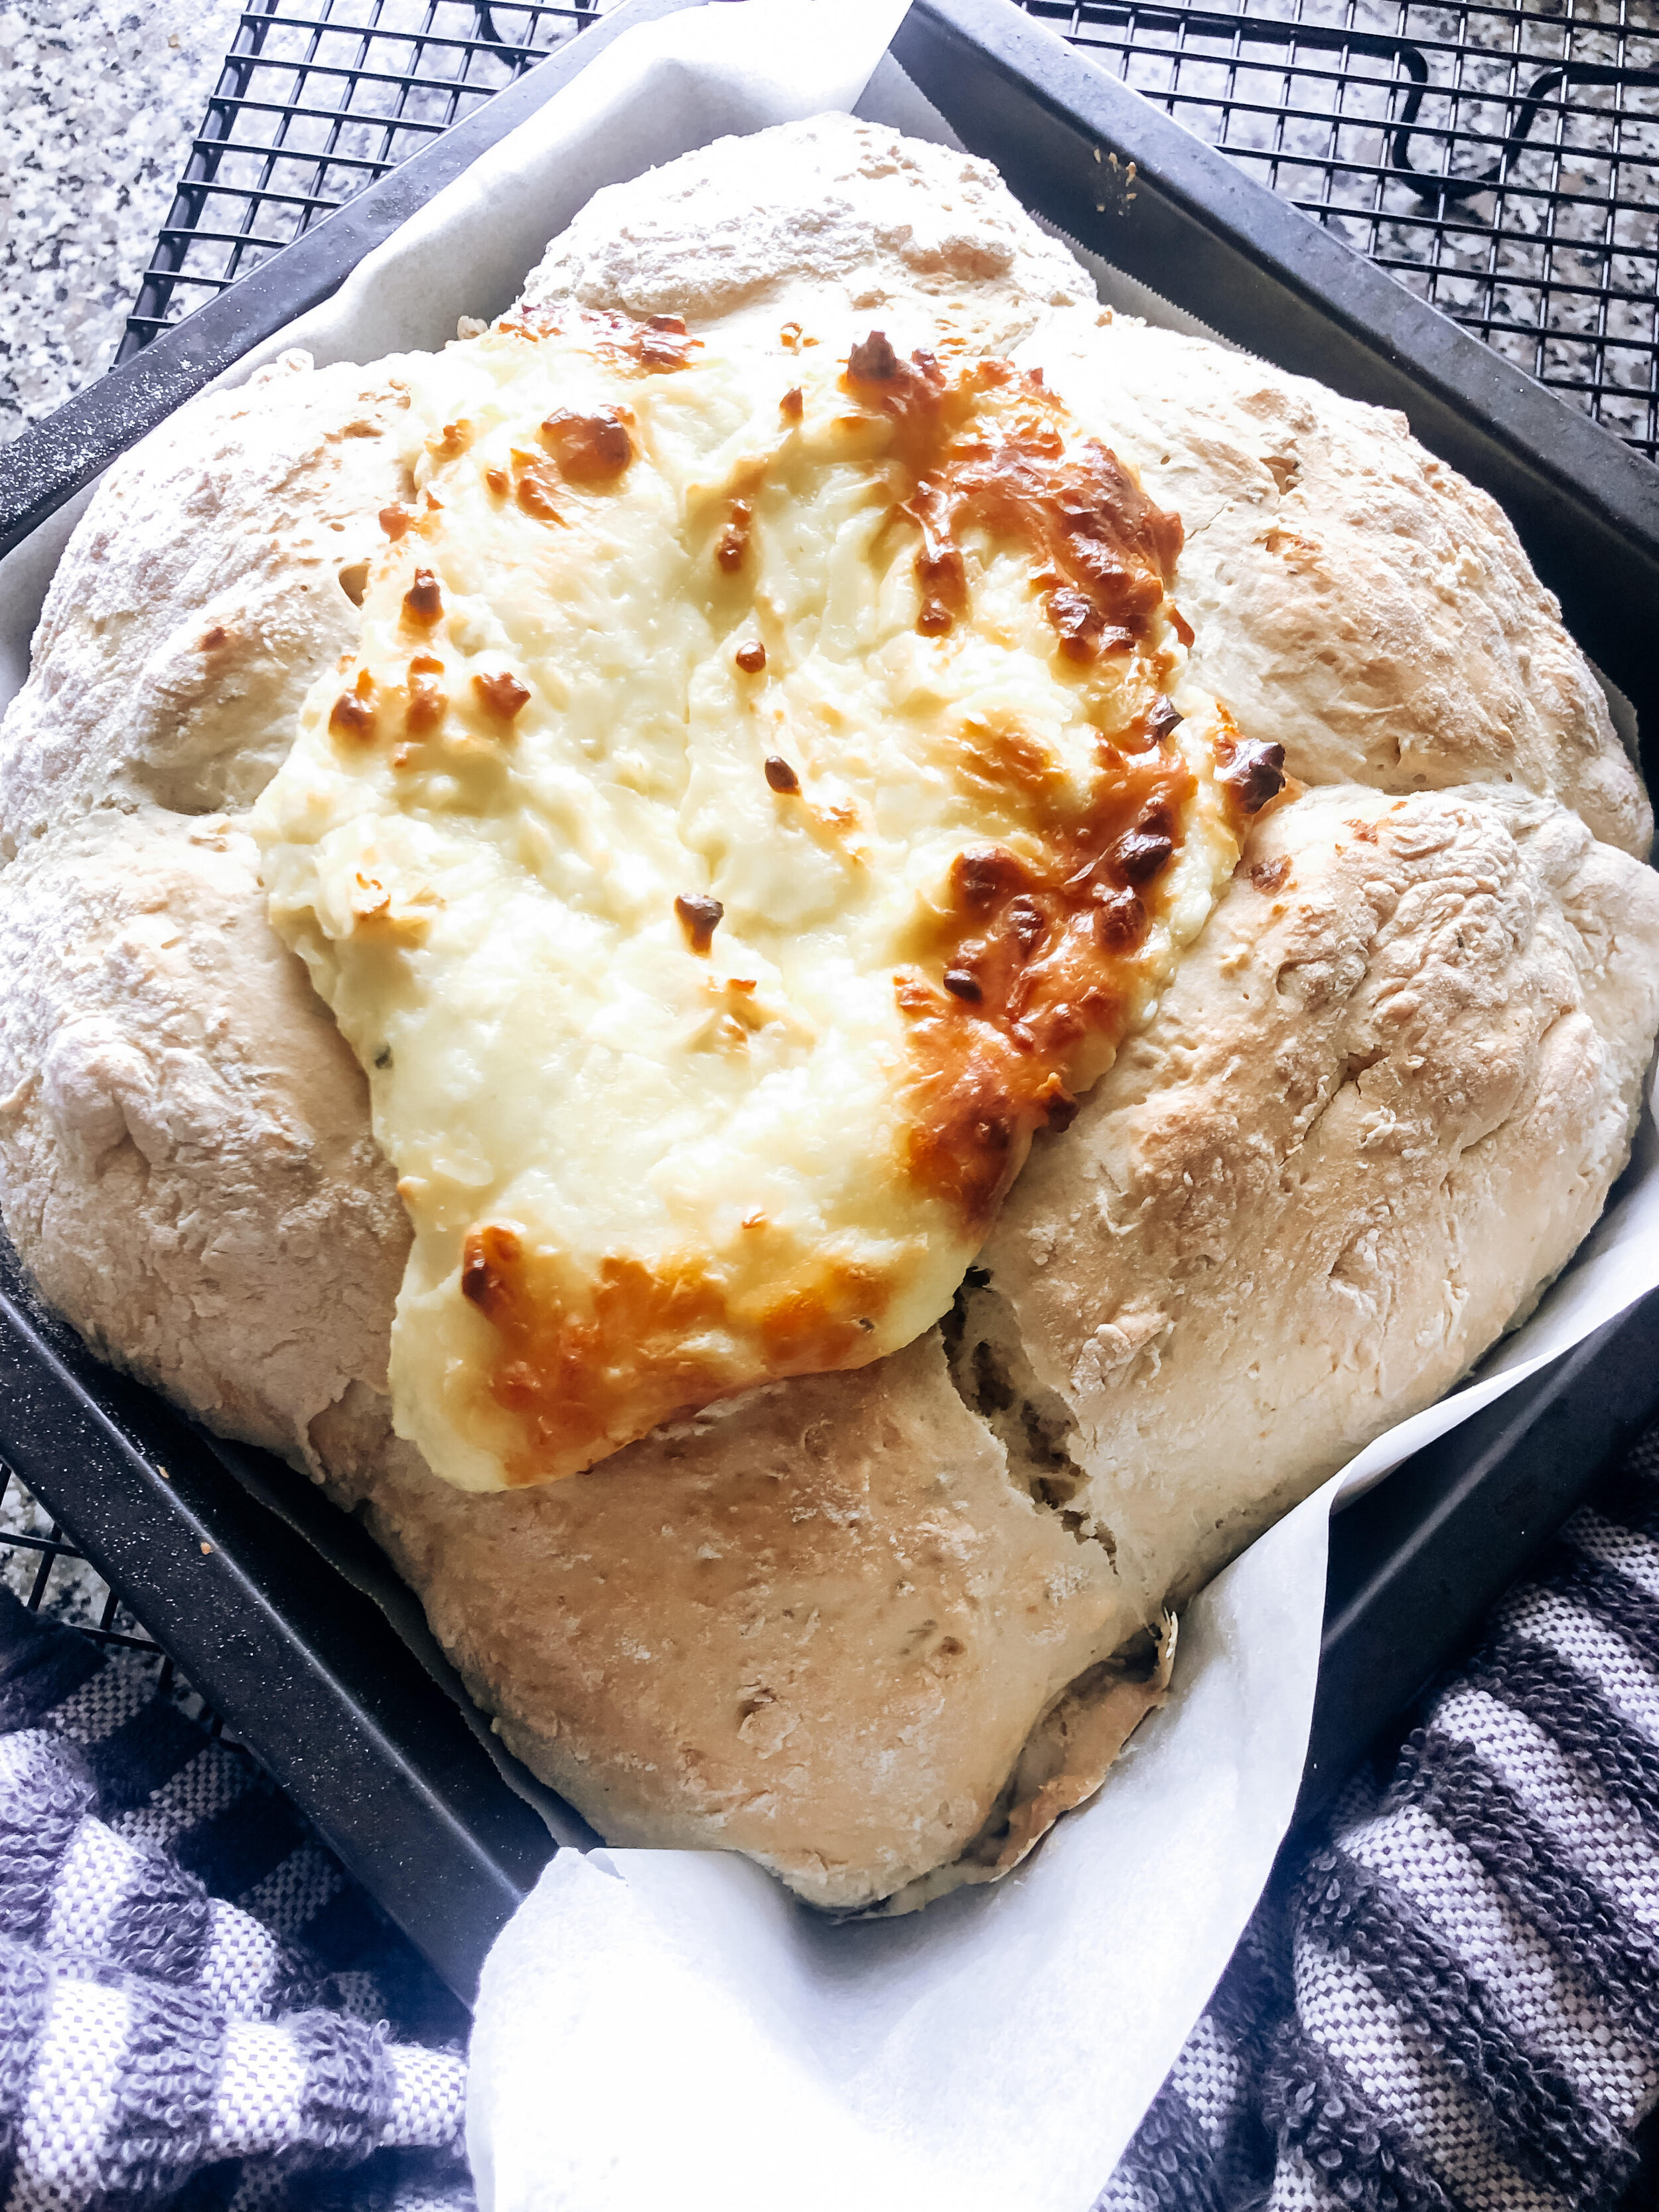
Cheesy Garlic Beer Bread Dip
This has got to be right up there on the list of what you make for Christmas snacks! Perfectly creamy and cheesy and everyone will dig in! So make sure you have enough!
I have recently started experimenting with way smaller balls and making double layers of these little balls! So it actualy looks more like a wreath than a big blob like I had it in the beginning!
This dip, has all the amazing flavours of a garlic bread, but in a dip! You can serve it up for the next rugby game or weekend get togethers around the BBQ!
This dip is a game changer!
Its easy to make! Mix the ingredients, make your beer bread and pop in to the oven!
It’s a Cheesy Garlicky perfection! For this dip to be the best it can be, use fresh garlic! You just cant beat it!
Need to make it even better - roast you garlic and thank me later!
INGREDIENTS NEEDED
225 g Cream Cheese
1/4 Cup Sour Cream
1/2 Cup Grated Parmesan Cheese
1/2 Cup Grated Mozzarella Cheese
5 Large Roasted Garlic Cloves ( use to your preference)
Parsley for Garnish
Salt and Pepper
Some Helpful Tips
Use Full Fat Cream cheese - it add to the flavour and creaminess
Use a mixer to add air to your mixture, it creams the ingredients and creates a nice and fluffy texture - much easier to scoop up!
Try adding some of your own flavours - here a few of my suggestions
- 1/2 cup frozen spinach - or finely chopped fresh
- 1/2 Cup sliced jalapenos
- 1/2 teaspoon Smoked Paprika
Beer Bread with Cheesy Dip
1 Packet Beer Bread Baking Mix of your choice ( I used Oregano Garlic Sage and Rosemary)
225 g Cream Cheese
1/4 Cup Sour Cream
1/2 Cup Grated Parmesan Cheese
1/2 Cup Grated Mozzarella Cheese (Feel free to swop these out for any other cheese)
Salt and Pepper to taste
Preheat your oven to 200 C and toss your garlic with some olive oil and roast.
Smash them up finely with a fork.
In your mixer combine Cream Cheese and Sour Cream, and cream . Add your Cheese, Garlic , Salt and Pepper and any one of the extras or all, depending on what you prefer! Mix it all up! And taste it, you have to!
Make the Beer Bread as per instructions on the packet and form into little balls. The mixture is sticky, so keep dusting your hands in flour, I do recommend making smaller balls than the picture! I have also started using two beer bread baking mixes to make a double layer of small balls, so you end up with a wreath!
Cover your baking tin/sheet in baking paper and place your Beer Bread balls on this into a circle, leaving a hole in the middle, roughly 10 cm diameter. ( I use the cream cheese container to guide me here!
Add your Cheesy mixture to the middle of your dough ball ring and bake for 30 minutes!
Add your Parsley as a garnish to the top and pull your little balls off and dip into the cheesy mixture!
LEFTOVERS…
If you have any leftovers the bread will only store for a day or two, warm it up in the oven if you need it a little fresher! The dip will last 4 days in the fridge!
Beer Bread Croutons
Ever have any Beer Bread left over… I know, it doesn’t happen very often! BUT on the off chance you do have some left over, the bread doesn’t tend to hold very long in a airtight container, and who wants to waste!
This is the perfect hack! It lasts FOREVER in the fridge, trust me, I forgot about a container right at the back, and with the kids constantly in the fridge shuffling everything around, somehow I didn’t see it… they were still as crispy as the day I made them!
These are lovely on top of salads, soups and pasta! Do you have nay other ideas?
My oldest actually likes to eat them as is, like a snack! Who am I to disagree!

This is honestly the easiest “cooking” you will do! It takes 10 minutes in the oven and only a few minutes of cutting time, depending on how many slices of Beer Bread you have left!
Beer Bread Croutons
A great way to use up left over Beer Bread, if any, as this bread does not keep very well
Preheat your oven to 200°
Cut Beer Bread into small bite sized pieces and place into oven proof dish - either line your tray with baking paper (easier to clean up), or place directly onto your tray
Toss in a bowl with olive oil and mix until nicely coated
Grill on 200° for 10 minutes tossing once or twice so as not to burn
Take out once pieces are a nice golden brown and cool down completely.
Keep in a air tight container in the fridge
Dried Lemons - the perfect teacher gift!!
Perfect for your next Lemon and Lavender Cake… hint hint - we have the best vanilla cake mix!
These are even more amazing on the perfect cocktail or ice tea … whatever is your preference! 🍹
Another one of my favorite holidays recipes and pre-holidays vibes - I do sample a few new cocktail recipes - just to make sure they taste right!!
There really is no tip or trick to them, the only thing I find is the issue to use baking paper and a tray or straight onto the rack!
I use the oven rack and then cooling racks - however, my oven racks are quite wide and the smaller lemon slices tend to slip through the cracks !
So for these, I do add some baking paper and at about 1.5 hours in, I take the baking paper off, as they just don’t dry out enough! They need the heat and air from all sides!
We have a humidifier - and our light blew, we tried to make grapefruit and lemon slices and no matter how long we had it in they didn’t dry! So, I am definately still going to try that!
If you are looking for the perfect teacher gift or Christmas gift, this is it! I promise your teacher would love to have something she can use to unwind after a full day with kids!

Here you go….
INGREDIENTS
Lemonssssss
Oranges
Grapefruit
Limes
Whatever citrus fruit you have growing in abundance, or choose to use!
Put your oven on 90 C
Slice your citrus thinly, you can add a mixture of all of them, they all dry at the same time. I recommend you TRY and get them 0.5mm and all of them!
A mandolin I would think is your best bet - however, I just slice them with a knife and eye ball the thickness!!
Depending on the size of your lemons - they do shrink - either add them directly onto your racks or add baking paper and then put them onto the racks.
If you are using baking trays, you will need to add baking paper as they tend to get stuck to the tray as they dry out!
Place your racks back into the oven and set time for 1.5 hours. If you can take the baking paper out, do it other wise give them all a flip and return for another 1.5 hours.
After the times up, remove the ones that are done, dark caramel brown. Return the ones that are still yellow, sticky and just not done! Give them 30 minutes at a time extra.
Let them cool down completely and store them in a airtight container! I store mine in the pantry in a plastic container.
Bottle them up in a nice glass jar and if you have some extra crafty tools, add a nice little sticker to the front for gifting and do pair it with a baking mix! The perfect teacher gift!
Crumpets / Flapjacks / Pancakes
Gosh… these are called all sorts of things in all parts of the world!
But, in short , small, fat little circles of absolute delicious-ness made to taste just like a pancake but topped with something different!
I saw this hack… and I had to give it a try!!
With the holidays coming up, I thought Id start to share some of the things I do, with my family to make life easier and more yummy! Christmas for us is about taking it easy and eating waaaay to much!

TIPS and TRICKS
You realy need to use a small tray to freeze these in, remember the entire “hack” is about saving time and because you are frying straight from frozen, they need to be small to actualy cook properly!
Ice cube trays actualy work the best, however, I threw a load out the other day and the rest where filled with ice!!
To save space, once frozen pop, them out and store in a zip lock bag back in the freezer
Keep your heat low - if not you will burn the bottom and still have a frozen middle
STORAGE
Store in the freezer in a closed container - zip lock bag for 1 month. That’s how long I did it, and they are fine!

INGREDIENTS
2 Eggs
1/2 Cup (125ml) Sugar
1 Cup (250ml) Milk
2 T (30ml) Melted Butter
2 Cups (500ml) Cake Flour
4 Teaspoons (20ml) Baking Powder
1/2 Teaspoon (2.5ml) Salt
1. Beat the eggs and sugar together. Add 125 ml (½ c) of the milk and the melted butter, margarine or oil.
2. Sift together the flour, baking powder and salt and stir or beat into the egg mixture.
3. Gradually stir in the remaining milk to form a smooth batter.
4. Spoon into freezer proof containers - Ive just used a silicone muffin tray, add some chocolate chips and/or fruit and pop in the freezer!
5. Cook on LOW heat and once melted turn over!
6. Serve with your favorite topping!

Chocolate Chip Cookies - Low Carb Keto Variation
I do not know anyone who does not like a Chocolate Chip cookie! Seriously, do you?!
The perfect salty cookie crunch to the sweet gooey chocolate chips, it’s delicious served with tea, as a snack or honestly just when you walk past the cookie jar - just take one, no one is looking !
So many of my friends love these cookies, they have adapted the recipe for all sorts of ad ins! My favorites from there lists, white chocolate chips and cranberries, white chocolate and cashews and caramel chip pieces! I will be sure to get the recipe from them and update this!
Chocolate Chip cookies realy are a simple pleasure in life!
STORAGE INSTRUCTIONS
Store in a airtight container for up to 3 days
YES FREEZE THE DOUGH!
Make one batch and half it or make a double batch and freeze the other! You don’t even have to thaw out the dough! Just add 2-4 minutes to your baking time! PLEASE CHECK YOUR COOKIES AFTER 2 MINUTES!

CHOCOLATE CHIP COOKIES
1 Egg
1 TBLS Coconut Oil - or butter
1/4 Cup Peanut Butter of choice - I prefer chunky
3 TBLS Maple Syrup - or sweetener of choice
1/4 Cup Brown Sugar - or sugar of choice
1 TSP Vanilla Extract
1 Pouch ORIGINAL NUT FLOUR Baking Mix
1/2 Cup Chocolate Chips - I prefer slabs chopped into chunks - or no sugar chips
Optional Sea Salt Flakes for sprinkling on top
Line your baking sheet with baking paper and pre-heat your oven to 180C
Whisk together the egg, *maple syrup, melted coconut oil/butter *sugar, peanut butter and vanilla extract.
Add the pouch to the wet mixture and then add the chocolate chips/chunks into the this mixture. Give this a thorough mix until its all combined and mixed through. I prefer to chill this cookie mixture in the fridge for 30 minutes before handling it, however not necessary at all. * If you are freezing your dough, roll it out into a log shape and cover with cling wrap and a layer of tin foil. When ready to bake remove from freezer let it sit for a few minutes and cut off your desired amount of cookies 1-2cm thick and bake and remember to add to your baking time as mentioned above!
Use 2 TBLS worth of dough per cookie, roll out ruff balls and place onto the tray. Feel free to flatten them out with a spoon or a fork, I prefer to squish them slightly but still leave them nice and chunky!
These have been made to be irregular, chewy and imperfect cookies!
Bake for 10-12 minutes (depending on your thickness) if using salt flakes, add these directly after baking and leave to cool in tray for a few minutes before transferring to a wire rack to cool completely
Easy Apple Pie - from scratch-ish
The ultimate indulgence for me is a Apple Pie, I don’t know what it is, if it’s the buttery taste or the cinnamon, but all this combined in together with a crisp flavored crunchy crumble, is the best dessert ever made! So, i had to give it a go and make it with our baking mixes!
Now, purely because I haven’t and most likely won’t try any of the other mixes, the Original Bread Mix is the one to use!
It’s the perfect recipe to whip up for yourself or for when you have guests and you will look like a pro when serving it! Who could seriously resist a slice of warm Apple Pie with a crunchy topping?!
I have done this many times and many different ways, my two favorite ways, one being way shorter than the other!
I honestly don’t mind using tin apples! I know a lot of people swear by fresh apples, and don’t get me wrong you can’t beat a fresh apple on any given day, but for ease and super quick-ness, tinned apples have a really good spot in my pantry!
IF USING FRESH APPLES
Again - here is a preference - when using fresh apples, I tend to use two different sorts. Some are sweet, some are tangy and they all tend to add a flavour to the Apple Crumble.
Peel and thinly slice your apples. Add apples to a bowl and add ready made cinnamon sugar and 1tsp vanilla extract (optional) and toss to combine.
Bake at 200 C for about 30 minutes, continuing to toss in between so they don’t burn! They will start to go nice and soft and caramelize.
By doing this step, you reduce the time of the Apple Pie in the oven and can make 100% sure you get the nice soft apples in your pie, nothing worse than a crunchy apple!!

Soft caramelized fresh apples
The Best Apple Pie Recipe
8 - 10 Fresh apples - peeled and sliced or 2x tinned apples
4 TBLS Soft Room Temp Butter
Ready made Cinnamon Sugar ( cinnamon and sugar mixed)
1 Pouch Original Bread Baking Mix
This is for a medium Apple Pie - 4 - 6 servings
Bake apples at 200° for 30 minutes, tossing inbetween ( detailed method above)- or if using tinned apples pour out tinned apples into a bowl and add your cinnamon sugar mixture. Add cinnamon sugar to your liking.
*If using fresh apples - Once baked, pour out into desired oven proof dish and sprinkle with some cinnamon sugar to your taste. I do tend to have a heavy hand here :)
Mix half pouch Original Bread Mix with the butter and 2 TBLS cinnamon sugar mixture until nice and crumbly, you will have to get into it with your finger tips.
Sprinkle this crumb mixture all over the apples, covering all the apples and place into the oven to bake and caramelize for another 30 minutes (if it does go too brown, cover with tinfoil until sugar has melted)
Take out and enjoy with some whipped cream and or ice cream! Remember it will be hot, so use your discretion on how hot you would like to eat it!
Low Carb Keto Buns
Sometimes I feel like I need a change, a change from the normal “slice” of bread and even though it tastes the same, I think the idea that it looks different gives me what I need!
Making these buns are dead easy! You can break it up in to a handful of quick steps and in no time you will have buns!
The hold together perfectly when adding a patty for the ultimate burger! They are also perfect when pairing with your favorite topping and even when grilled to add some crisp to your cheese! It’s one of those ideas that you just need to try when converting a baking mix as it wont fail you!
I have used all of the 4 baking mixes from Flour and Dough range. It realy depends on what your after, savoury, sweet or add your own effect! They all work perfectly and beautifully!
The recipe makes about 6 buns if you keep them to the size of a regular burger bun in the store.

TIPS AND TRICKS
do add some extra seeds to the top of each bun, not only does it look fancy it adds an extra layer of nutrition and flavour
remember, these do not rise like a normal loaf/bun would, so the air you have made from whisking your eggs ( read blog post here) is what helps give it the airy texture, so try not to handle the buns too much
If you do feel you need a bit of extra, do add an extra egg!
INGREDIENTS
1 x Flour and Dough Baking Mix - Keto Variety
OPTIONAL - 2 Tablespoons of Chia Seeds
Pre heat your oven to 180% and get your baking sheet reay, line with baking paper
Pour out your baking mix into a bowl and add your Chia Seeds, if using.
Mix your baking mix as per instructions on the packet.
Rough measure off 6 pieces and quickly shape them in oval shaped forms and lay
them onto your lined baking sheet. They do not loose there shape.
Add extra seeds, flavours onto the top of each bun and cover with foil
Now bake exactly the same way as described on the packet.
Let it cool down and enjoy as you prefer
Hope you enjoy the new addition to making our mixes a little something different!

🍩 My FAVORITE chocolate Ganache receipe 🍩
Ganache is one of those best kept secrets that seriously should not be a secret!
It’s a two ingredient secret weapon thats heated and stirred until it’s silky and smooth and an amazingly beautiful rich colour!
It’s not only quick and easy, just as I like it, it’s uniquely versatile.
Its perfect for layering in between cake layers, covering cakes, cupcakes and donuts! Using it as a dipping sauce ( strawberries anyone)for churros and even sugar cookies! It works amazing to pour over brownies and ice cream or even your christmas pavlova! It’s an endless list of what you can do!
Like I said- chocolate ganche should not be a secret and most definately a receipe in any households arsenal!!

I know there are allot of receipes that tell you to use certain chocolate chips and certain chocolate for ganache. I have never had a problem with any chocolate I have used. I do tend to use a chocolate that I love!
For this I used a Nestle Milk Chocolate and normal pouring cream.
The only “issue / difference” that I find is when I used a chocolate chip/ compound it doesn’t always melt as thoroughly as others.
Tips and Tricks
if your chocolate doesn’t melt all the way through after you added it to the cream - I prefer to give it a quick whizz with the hand blender and being careful not to incorporate any bubbles
Chop your slab chooclate into smaller pieces - this helps it melt easier
Cool the ganache considerably before you use it to pipe onto cakes/cupcakes
Let the chocolate and warm cream sit for a few minutes after you have added them together- the warm cream starts melting the chocolate

Chocolate Ganache Receipe
For me, I prefer to keep it to the basic 2:1 ration! 2 parts chocolate and 1 part cream
80g cream
160g chopped chocolate
To cover a large bundt cake ( as pictured below)
warm your heat proof bowl in the microwave ( dont ask why as you warm the cream in this bowl to - this is just how Ive always done it)
Add your 1 part cream ( this video I used 80g) so add 80g cream and warm it up - 1 minute will do
Add your chopped chocolate ( again this video) 160g of chopped chocolate or your chocolate chips
Let it sit for 30 seconds and start to stir, be careful not to add bubbles or stir vigorously! ( you can see I did not follow my own advice here as I was in a hurry!) It will combine!
Stir slowly and before you know it the chocolate and cream will have combined
Let it cool slightly before you use it - I like to start using it for cakes ect when it looks like a peanut butter consistancy
Cake mix used for this Chocolate Bundt cake is the very same Cake/Cupcake Mix that is used in the Cake Kit!


Banana Bread Baking Mix - variation
I have not met a person who doesn’t, at least, like Banana Bread. I do know a lot of people who love Banana Bread - I’ll just put myself into that category!
I was very tempted to make a Banana Bread mix, so a actual Banana Bread Baking Mix, but in all honesty, its just to easy to alter these that I didn’t make that one a reality!
It’s such a nice way to use up all those left over bananas and not have tons laying around frozen waiting to be added to your next smoothie! It’s quick and easy and most of the time is spent in the oven, so if you can wait for it to bake, well then the worst is over!
I tend to make this one quite often as my kids are interesting, one day they will each have two bananas, I then go back to the shop grab a few more…only to have those left to go rotten and everyone is ALLERGIC to bananas! How that happens sporadically, well, I haven’t been able to figure it out! Ha Ha
The last addition I made, I added small chocolate chips to the mixture! For me, I LOVE it just as is, the kids, loved it even more as it had chocolate in!

Banana Bread
What you will need to make this from our baking mix
Ripe Bananas - yes those yucky brown ones that no-one is eating - yuckier the better
Eggs - room temperature is best
Sugar - any sugar of choice, in this one I used norma white sugar, but I have used Allulose and it works perfectly
Butter/ Coconut Oil - either works perfectly
Yogurt - I prefer to use Vanilla Flavoured from The Collective (New Zealand) but don’t use any fruity flavours
This bread is wholesome and nutritious and delicious all in one slice! The Almond flour is high in protein, vitamin E, fiber, healthy fats and low carb! Its great for a more nutrient dense meal!
It’s also naturally sweet with the added bananas, so you don’t need to use a lot of added sweeteners.
Tips and Tricks
I like to add a pinch of cinnamon to the mixture, it feels all sorts of christmas vibes and smells delicious when baking!
When adding the Chocolate chips, make sure you take some of the sugar away, I like to remove 1/4 cup, otherwise it becomes realy sweet
Do not open the oven - I know it’s tempting and I will tell you to check your bread for when its done, as every oven is different, but do it quick and stealthy!
Let it cool COMPLETELY in the pan before you take it out and cut it!
My favorite way to eat this is just layered with butter! But you do you and add what you want! My kiddos love it with peanut butter!

BANANA, BANANA, BANANA
2 Medium Ripe Bananas, mashed - extra for decorating
2 Eggs
1 tsp Vanilla Extract
3/4 Cup Sugar
1/2 Cup Melted Butter
1/2 Cup Vanilla Flavoured Yogurt ( I use The Collective)
1 Pouch Original Nut Flour Bread Baking Mix (or any pouch you would prefer)
Preheat oven to 170° celsius. Line/Grease your tin of choice, loaf tin, muffin tin.
Add the pouch to a bowl, add the sugar, melted butter, eggs, yogurt, vanilla extract and mashed up bananas.
Mix it all thoroughly and pour into greased/lined tin. Place some bananas on top and sprinkle with some sugar. The sugar on top caramelizes the banana and the top of the loaf, yummy! (I tend to sprinkle it over every corner of mine! )
If the top starts browning too quickly, put some foil on top to cover it all up!
Bake for 60 minutes, please check your loaf after 50 minutes.
This will keep in a airtight container for up to 3 days. Make sure you eat it before then and leave me a comment of how you got on!
Halloween Brownies
When Halloween rolls around, as it does every year I tend to find myself getting excited to get the kids costumes and make up some yummy treats!
This time I chose to make Chocolate Brownies and added some ooey gooey melted marshmallows to make the cobwebs and for extra spookiness we added some candy eyeballs! If you prefer the Fudgy Blondies it will work perfectly well, too!
I am not going to lie, this is going to be slightly messy, especially if you are going to get your kids involved and helping out with the marshmallow cobwebs. But hey, I spose this is what its all about! Having fun with the kids in the kitchen and making some amazing memories while doing it! I am absolutely NOT GOING to judge if you pour yourself a glass or two, it does help with cleaning the mess afterwards!

Halloween brownies with some sticky helping hands
This recipe doesn’t ask for many ingredients or time - just a bit of sticky hands!
Marshmallows - white
Spooky additions - candy eyes, sour worms, cookie crumbs
SERVING SUGGESTIONS
Try using anything you can think of, I named a few suggestions above and cut the brownie slab into squares, rectangles or however your prefer and fits your ideas
This slab will last up to 5 days in a airtight container, if you want to give it a quick burst in the microwave to warm it up, do it! Just remember to watch what you have added to the tops so they dont burn/melt!

Halloween Brownie Slab
HALLOWEEN BROWNIE SLAB
1 X Chewy Chocolate Brownie Mix
Handfull of marshmallows - white
Candy eyes, worms, fingers, whatever goolish lollies you have!
Mix your brownies as per instructions
Leave to cool completely and don’t cut, yet!
Melt marshmallows in heat proof bowl for 30 seconds, once cool to touch, squish them in between all your fingers tips. Pull your fingers and hands apart to make webs. Put these webs onto your brownie slab and continue until you have the desired amount!
Now add your goolish treats and cut to the size you need!
WA LA - Halloween the easy way!
Keto Pizza Base - from our baking mix
Yes, you definitely can enjoy a good, loaded, yummy, cheesy pizza on the Keto Diet!
There is absolutely no need to give up pizza while changing your lifestyle for the good of YOU! This recipe is sooo delicious you can make your pizza base thin rt thick, I highly recommend thin!
The more you “get into” keto lifestyle, you realise there is an alternative to almost every meal! You can make any of your favorite meals, into some or other sort of keto/low carb meal! Win win! Pizza has to be up there on everyone’s list of I cannot live without it! SO, here is the version I make, using Flour and Dough baking mixes - so easy and honestly no mess or funny business!

INGREDIENTS
Flour and Dough Baking Mix - I recommend this one
Mozzarella Cheese - grated
Eggs - room temperature
Water - tap water / room temperature
Olive oil - just the one you have in the pantry
Everything else is already in your baking mix! Don’t go and add any more flavours or spices as it wont work as it should!
The best part is deciding what you want to add on top of your pizza! These are extra ingredients and you can play around with your favorite toppings!

STORAGE
Unfortunately this base doesn’t hold up very well under the toppings! It’s realy best to eat it on the same day! I have been wanting to try and put the left overs in the air fryer? I tend to find that left overs and even when making food in the air fryer, they tend to crisp up again better than the oven and most definately 100% times more than using the microwave - think soggy everything!!
HERE YOU GO - YOUR NEW FAVORITE KETO PIZZA BASE MADE FROM A BAKING MIX
KETO PIZZA BASE
1 1/2 cups Rosemary Garlic and Thyme Bread Mix
1/2 Mozzarella Cheese - grated
2 eggs
2 Tablespoons water - maybe a little more
1 Tablespoon Olive oil
EXTRA INGREDIENTS FOR TOPPINGS
METHOD
Preheat your oven to 190C
Mix all the dry ingredients together in a bowl.
Add your eggs, water and olive oil and give it a good whisk.
Now add the wet mixture to the dry and mix well.
Form the dough into a ball and place between two sheets of baking paper.
Roll out with a rolling pin to your desired thickness.
Remove the top sheet of baking paper and transfer to a oven tray/sheet and bake for 15-20 minutes on 190C
Turn up your oven to 210C and flip crust over and bake for a further 5 - 10 minutes - depending on the thickness of your crust!
Add your favorite toppings and pop back into the oven to melt your cheese!
Makes one medium pizza on these measurements.
Thanks to the amazing @sezzy_keto for the beautiful photos and help with all these amazing creations!
Easy Loaded Garlic Dip
SO, if you know me, you know ME! I eat everything with a sauce or a dip, otherwise what’s the point?
Its the easiest and quickest appetizer for entertaining with your freshly baked beer bread and turns into the greatest crowd pleaser of all time!
It truly is a dip that you should have everything in your pantry and can whip up in 5 minutes or less! Now thats my kinda cooking and the way I intended Flour and Dough to be! Beter yet, if you don’t have the exact ingredients at home, open your fridge and pantry, have a look around and
I promise you will find something in there that will work just as good!
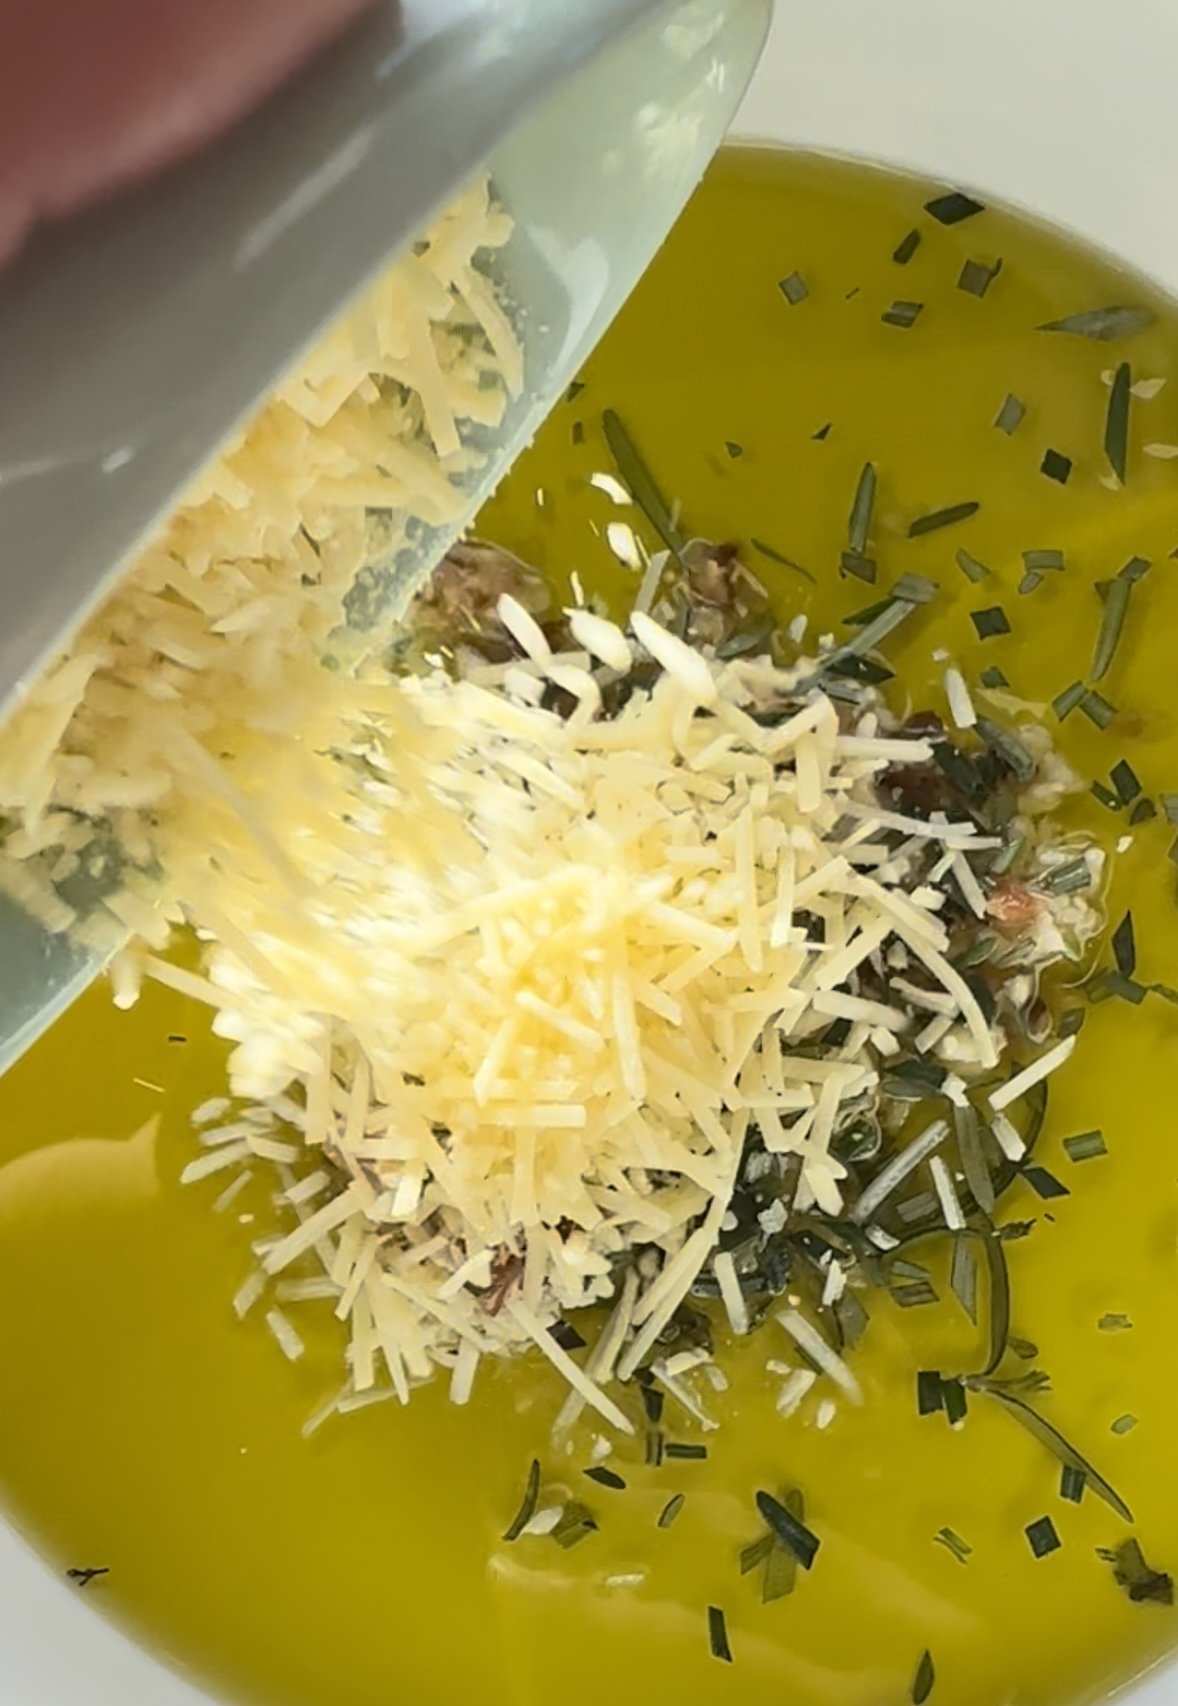
Loaded Garlic Dipping Oil
Here are the ingredients for this Loaded Garlic Dip and then I have added some variations of this specific dip that I have done and tried! I’ll make sure to capture some photos next time and add some more post about them!
Run down of the Ingredients list
Olive oil - I have just used whatever version I have in the cupboard at the time I need it
Balsamic Vinegar - again, I have used whatever version I have available
Garlic Cloves - I have used fresh cloves chopped up and some roasted ones
Parmesan Cheese - I use ready grated cheese here but feel free to grate
Fresh Herbs - I use whatever herbs I currently have growing in the garden
Salt & Pepper - to taste
Tips & Tricks
It will last about a week in the fridge in a airtight container, so feel free to make more. However, we end up finishing it!
Use a flat/shallow dish, so when you scoop you actually get a bit of everything and the oils don’t separate way down to the top and way down to the bottom!
I like to use my salt with a of a heavy hand, it helps bring out the flavours when adding to the beer bread baking mix. Make sure you taste yours!
Make sure you try some of these variations …
Pesto Bread Dipping Oil
Chilli Bread Dipping Oil
Sundried Tomatoe Bread Dipping Oil
Olive Bread Dipping Oil
I’ll update these link as soon as I have the photos ready!
Great, now this is what your here for…the Recipe

Loaded Garlic Bread Dipping Oil
1/2 cup Olive Oil
5 Roasted Garlic cloves
4 Crushed Garlic Cloves
1/4 Cup grated Parmesan Cheese
2 Sprigs Fresh Chopped Rosemary/ or other fresh herbs
Salt & Pepper
Mix it all together in a dipping bowl of choice / preferably a flat dish and add some salt and pepper to your liking!
Serving Suggestions
You have to use our Oregano Garlic and Sage Beer Bread, or if you prefer a tad spicier - Chilli and Garlic Beer Bread will do the trick!
Find yourself with some leftover dip? Fear not, I have tossed it through a crunchy salad the next day for lunch and served it over plain cooked pasta with some added shredded chicken! Delicious both ways!
Comment down below if you have made it and what variatons yo have done!!
Foodstuffs Emerging Supplier- Semi Finalist

A few months ago I saw an entry to the Foodstuffs Emerging Supplier competition and thought, why the heck not!
Now this is a competition worth its weight in gold! With an amazing reputation and foodies and entrepreneurs entering from all over NZ the entries are huge! With one of the prizes being a spot on all New World shelves in the North Island in the mix… why would you not enter?
Among others you get access to information, marketing and data! Gosh, this is almost better than winning $50k!
Knowledge is power in the end!
Anyway, so off I went and completed my paperwork, sent off the neccessary information and waited!!
To be notified of being a semi- finalist was absolutely amazing! Truly inspiring to know that what I am doing is going somewhere! Someone is looking and seeing and acknowledging!
Unfortunately, it came at the worst time for me! I was scheduled for some horrible surgery! Not only have I been dealing with the side effects of this issue for two years but I have always known at some point this little bugger would have to be removed and I would need a Craniotomy! Yes- you read that correct, in fact I had 2 within 5 days of each other as I had a CSF leak coming out of my nose while still in hospital!
So, this amazing humbling news came at the worst time for me and my family! We were stretched and pulled to our limits, the kids were all over the place and I was not in any space to mentally deal with it! I was not prepaired to have my head chopped open, twice!
So, needless to say, I didnt get any further other than a semi- finalist! I fumbled and slacked through the next phase, a video presentation and my mind was not with it, not were it should of been and it is what it is! There is nothing I can do about it now but go - what if? And thats not how I roll!!
So, from me, sitting on the couch outside soaking up some much needed TLC from the little bit of sun thats left over from today I am so thankfull for officialy being 13 days post op from the second round, stitches are out and Im having a realy good recovery, except for the issues I knew I would have going into this, permanent issues, Im learning to deal with them, one interesting step at a time, the new niggles are healing and some are starting to look better and I should make a full recovery from!
I am thankfull to have been a part of the Foodstuffs Emerging Supplier competition, it showed me what to expect, what to work on and where I am lacking and slacking!! Truly a humbeling experience in its own right!
To everyone that was part of this journey, weather you helped me with videos, photos or just words of encouragement, you are all an incredible part of my journey and I thank you from the bottom of my heart and my soul!

Flour & Dough and NZ Supermarket magazine!!
A while back I was asked if I wanted to take part in a questionnaire for NZ Supermarket News magazine!
Obviously I said yes!
Have a read here!! ⬇️⬇️⬇️

Keto Bread… the easy way
This range has become a staple in many households. Ranging from a loaf easy to slice and share on any occassion to muffins, pizza bases and bagels… the list is pretty endless to how amazing they have become!

Many occassions I have been caught without bread and guess what, everyone wants a toastie or french toast or something to eat that bread is the main part! Why this happens, I don’t know!
For me, I whip these up on auto pilot - the picture above, was exactly that - kids wanted french toast for breakfast and well, all I had was oats and eggs… clearly not winning at mom life today!
I like to add some extra seeds or nuts to the tops, I dont realy bother with matching up what I have to what loaf Im baking up! I just grab, sprinkle and go - I like to do things easy!
This is the Rosemary Garlic and Thyme loaf, with some added love of sesame seeds on top!!
Dipped into raw egg, fried in the pan and lathered in syrup or honey - depending on their mood in the morning!
It’s perfect realy, as its wholesome, low carb, keeps them full and is flavoured to the exact point of perfection!
Realy the perfect keto bread in my opinion! The baking mix that I love to keep close for these occassions that I need something quick and easy!

So next time your looking for a quick and easy bread to bake, make sure you have Flour and Dough baking mixes hanging out in your pantry, I promise you will be thankful you made the choice!
STEVENS at the heart of every kitchen
Its been awhile since Flour and Dough started popping up on a Stevens store shelf near you! But, it’s been amazing!!
My favorite part of shopping has now become finding a Stevens store, having a look around for where the baking mixes are and well, taking a few selfies! 😝
Can you believe Stevens has been around for 99 years! Gosh… I know! That’s a milestone!!

Recently they celebrated this amazing achievement and to think, Flour and Dough is sitting realy proudly on their 99 year old shelves!
Wow, I am incredibly humbled and proud
With Christmas now ramping up in every direction and gifts on the minds of every kiwi mum! I reckon Stevens is a good place to go and have a look around!
Who doesn’t own something that was baught from Stevens? I just recently replaced a blender… and well, off to Stevens I went!
With the ease of online shopping and deliveries, you can beat the ques and patiently wait for your parcel to arrive, straight to your door!!
You can find all your kitchen accessories, Flour and Dough baking mixes 😆 and more at your nearest Stevens!

Lets whisk our eggs…
This is such a random topic - I know!!
But I cant stress it enough!
WHISK
YOUR
EGGS
I can realy make it easier on you by saying, if you don’t want to, just add a extra egg, give it a stir and your good to go… but who wants to use another egg when they have become so expensive!

This is what my eggs look like when Im done giving them a good beating! Frothy and foamy!
This is how you want your eggs to look for your keto bread mix! The frothy foamy texture in the eggs helps give your baking mix the added extra ooomph it needs and captures the air inside the loaf! Nobody has time for a dense thick sandwich!
I don’t use any fancy equipment on these breads. If you know me, you know I love, and almost always use my mixer, for everything… well, not this!
I add my eggs to a cool plastic little jug I got from Kmart 🤣 and pop in my whisk and hold the whisk between both hands and with flat palms twist the whisk! This makes them nice and frothy in record time!
Egg whisking!
This video was made one handed though… but Im sure you get what I am trying to say!!
After you have whisked those eggs to perfection, add them and the rest of the ingredients needed, give it a quick mix! You dont want to loose all your bubbles and effort you put into whisking them up!
Bake for 30 minutes and enjoy!